 LinITX Blog Ubiquiti & MikroTik Wireless Networking Experts

This is a short HowTo which will cover the set-up of Mikrotik to Mikrotik VPN but secured with IPsec. The use of IPsec can be very CPU intensive and it is recommended that the VPN server be set up on a Mikrotik which supports hardware based AES/IPsec encryption such as the Mikrotik RB850Gx2, RB3011 or any CCR series router.
I will be using a RB850Gx2 as my VPN server and a Mikrotik mAP as my VPN clients, all the heavy IPsec processing will be done on the RB850Gx2 which has AES hardware for offloading IPsec calculations. ROS 6.33.3 or higher on the client side is required in order to make use of the ‘easy IPsec connect’ feature.

Server Side
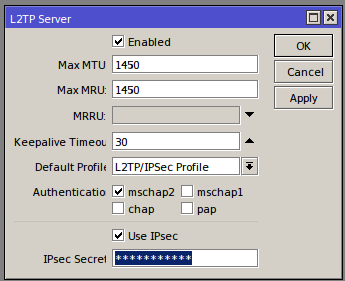
This is very much the same as the set-up in Part 1 which can be found here. The only additional requirement for the server to handle IPsec requests is that the ‘Use IPsec’ check box found in L2TP Server in the PPP menu is ticked and a secure secret is entered.
Providing you followed the steps in the part 1 HowTo with the creation of new IP Pools and a masquerade rule for vpn connections the VPN server should now be ready.
Firewall
Dependant on your current firewall configuration it may be necessary to allow some ports through for the successful connection of L2TP IPsec connections. The ports needed are below : –
- UDP Port 500 (L2TP IPsec IKE)
- UDP Port 1701 (L2TP tunnel)
- UDP Port 4500 (L2TP IPsec Nat)
- Protocol 50 (ipsec-esp)
- Protocol 51 (ipsec-ah)
Client Side
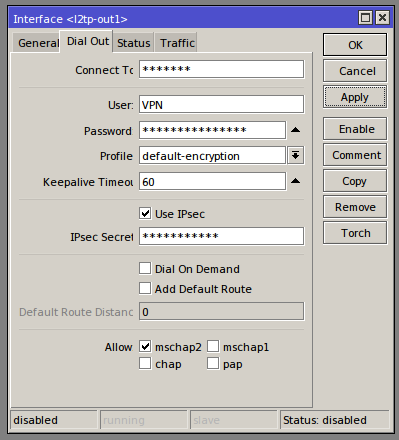
This side differs slightly from Part 1 as ROS 6.33.3 introduces a ‘use IPsec’ feature as seen in the image below. Simply fill out the ‘Dial Out’ section of the l2tp interface using the profile created as per the part 1 blog, ensure that ‘Use IPsec’ is selected and you input the IPsec secret you entered on the server side.
Once complete select apply and enable (if not already enabled), under the status tab you will be able to see the current connection status. If successful you will see ‘Status: connected’ in the bottom right and also a local and remote address will be displayed.

Further confirmation of a successful IPsec connection can be found on the server side by navigating to IP–>IPsec, if successful you will see an active IPsec policy in place displaying the the server public IP and the connected clients public IP.
Routing
If you want to send all the client traffic out across the newly IPsec secured VPN then ensure the ‘Add Default Route’ box is selected on the client side ‘Dial Out’ settings. If you only want to direct certain IP ranges across the VPN then manually create a static route in IP–> Routes and ensure that the gateway is the VPN interface.


Is there any IPSec setting needed like peers etc or would the default be fine?
Default is fine, all ipsec setting are created automatically created during the connection.