Setting up a 3G/4G/LTE internet connection is becoming increasingly popular, especially with more and more people starting to work from home, in areas where broadband may be lacking or of very poor speed. As a result, we receive a lot of queries asking about setting up a mobile data solutions and optimising for use in their install location.
Before we begin – LTE connections are highly dependant on what the cell tower in use can offer and how other factors such as the amount of clients it’s servicing can affect this (including other LTE routers/dongles, mobile phones and tablets). For this reason, it is rare that you would see the advertised maximum throughput figure that an LTE device can achieve within a real-world install.
It is also worth noting that any comparisons with other 3G/4G/LTE equipment (such as mobile phones) is only relevant if the LTE Modem category of the device is the same as the unit you are looking to install.
We often hear from people who have tested the coverage in an area with a more recent model of mobile device, which can include a CAT21 modem; this sets an expectation that these higher CAT21 speeds are obtainable with a CAT4 or CAT 6 device, which are only capable of their respective max speeds (listed below).
Other factors, such as the antenna gain and whether this is omni-directional or required alignment, should also be considered when it comes to the variables you might see, so we encourage people to not get too caught up in pre-run tests, unless it has been performed with the equipment you intend to use.
1 – Choosing the right category LTE modem
Before choosing the product that you wish to use, you will need to think about which Category of LTE device you are looking to install. The category of modem that any device is equipped with, will determine what is possible in terms of how that LTE device will function/perform, with the two most common categories that we sell, currently being Cat4 and Cat6.
Cat4 devices are capable of speeds up to 150 Mbps down and 50 Mbps up whereas the Cat6 devices, through a technology known as carrier aggregation that allows a single device to use multiple (2 for Cat6) frequency blocks at any given time to increase the possible data rate, offer up to 300 Mbps down and 50 Mbps up.
Again, it is worth emphasising that these are advertised figures and when installed in the real world, we would not expect to see the full 150/300 Mbps download speeds, so you would need to run some tests at the install location to find out exactly what is possible.
Carrier aggregation is also highly dependant on the tower in use – just because the LTE unit you purchase may support this, we cannot guarantee this will be something you can implement at the install location or, if you can, that it will exceed the 150 Mbps data rate that a Cat4 device could theoretically offer.
2 – Install Location
Once you have purchased a unit and have taken delivery, the first thing you should look at, is where you intend to mount the device; in order to understand where this may be, you will need to find out the location of the closest cell tower with a good line of sight to your property. This may not always be the nearest tower, so we encourage you to use a website such as cellmapper.net, which displays tower locations; this will give you an understanding of where towers that support your network provider are, and then figure out where you would need to mount the device to achieve the best line of sight.
Depending on the best location to mount your device, this may result in mounting the unit at the other end of the property than you originally planned, or in extreme cases, may mean removing the LTE router from the property altogether and mounting it somewhere else on site.
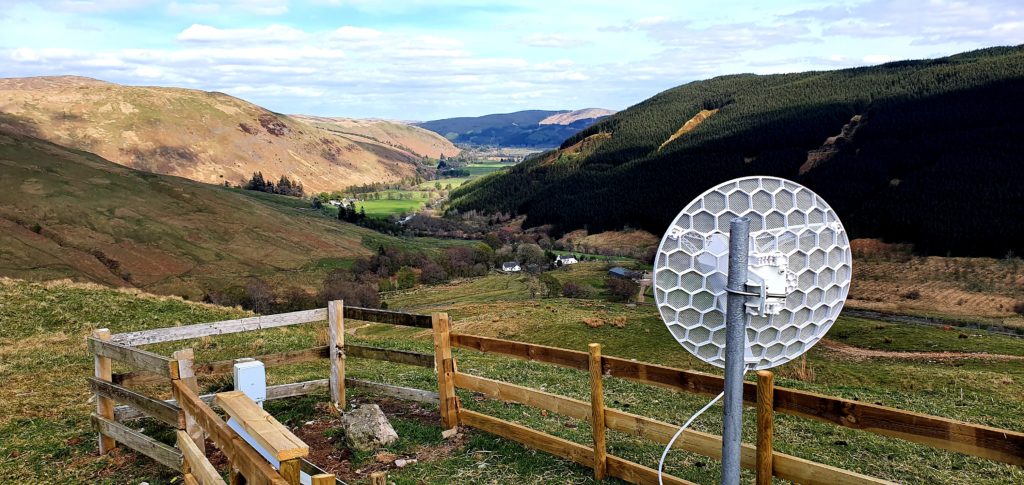
You can see from the photo below, a customer from Wales overcame the line of sight issue at the bottom of a valley, by mounting the unit on top of a hill; allowing the unit to point down through the valley, to avoid the land and trees between itself and the tower.
Again, in this example, the tower used is not the closest, but as all others are blocked out by the environment, this one proved to give the best performance.

3 – Alignment (directional devices only)
Once the install location for your device has been established, if you have a directional device such as one of the MikroTik LHG+R11e‘s or QuRouter XXXM‘s, you will need to make sure you have aligned this to the tower you are using.
Start by mounting the unit in the location chosen and point it roughly (yet accurately) at the tower you intend to use. From here, you can open the management interface of the device in question and look at the signal readings which will be displayed as follows:
RSRP – The average power received from a single reference signal.
RSRQ – The quality of the received signal
RSSI – The entire received power including the wanted power from the serving cell as well as all co-channel power and other noise sources.
SINR/SNR – Signal-to-noise ratio of the given signal.
Once you have taken the initial reading, you can go ahead and make small changes to the alignment to see how this affects the readings until you are satisfied that you have aligned the unit correctly and are getting the best signal available at that location.
For each parameter, you are looking for the highest number achievable before you then lock the unit in place. This can take a few minutes to get right but it is important to make sure this is set correctly in order to get the best performance going forwards.
Note:- The RSRP, RSRQ and RSSI will always display a negative number, with the highest number in this case being the closest to zero available. For example -75 is a much better reading than -115.

4 – Band Usage (optional)
Once the unit is installed and aligned (if required) to the cell tower you intend to use, you should have a stable connection that you can now use with confidence that it has been installed correctly. This being said, we do sometimes get asked about whether there is anything else that can be looked at to ensure/confirm the device is getting the best speeds available. The answer to this is to compare the speeds across different bands.
Out of the box, the LTE units will come with automatic band selection enabled and the device itself will do its best to connect to what it deems to be the best band. However, this can be overridden and bands selected manually either singularly or in groups.
The first thing you will need to do is to find out a) which bands are supported by your network operator and b) which ones are being used at your selected cell tower. From there, you can select each band individually to see what speeds are being achieved on each. This will be tower, rather than band specific so do not assume that because band x was best at another install it will be the best here.
Once the comparison has been done, you can manually set the band/s that gave best speeds and/or exclude any that under-performed so that you can sit in the knowledge that this has been set up in optimal conditions for that install and will provide the best possible service available.
We hope this guide has been useful in pointing customers in the right direction (pun intended) when installing an LTE device for optimised 3G / 4G internet connections. If you require any further information on LTE devices and configuration, please call our team of experts on 01449 888000 or email shop@linitx.com
 LinITX Blog Ubiquiti & MikroTik Wireless Networking Experts


One comment
Pingback: LinITX Guide: How to Update the MikroTik LTE Modem Firmware with a Local File - LinITX Blog