 LinITX Blog Ubiquiti & MikroTik Wireless Networking Experts

This is part 1 of a VPN HowTo to aid in the set up of secure VPN services on Mikrotik Devices, in part 1 I will focus on basic set-up and MikroTik to MikroTik secure VPN. Part 1.5 can be found here which focuses on Mikrotik to Mikrotik IPsec VPN. Part 2 will focus on setting up a secure VPN with IPSec to a MikroTik from a mobile IOS or Android and a computer with Windows/OSX/Ubuntu based operating systems.
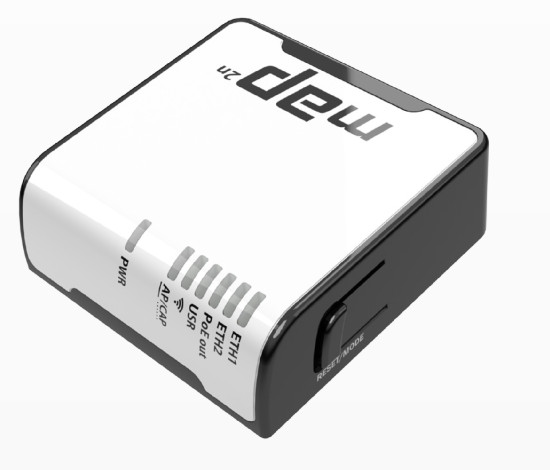
For Part 1 of this HowTo i will be using a CRS 125-24G-1S as my home router and VPN server and mAP as my remote MikroTik router, the goal of this HowTo is to establish a SECURE connection back home (or in the office) in order to access Home/Office resources/services and also bypass restrictions and vulnerabilities that may be imposed by unfamiliar internet connections. (all instruction and images in this HowTo are derived from RouterOS Version 6.19)

Server Side
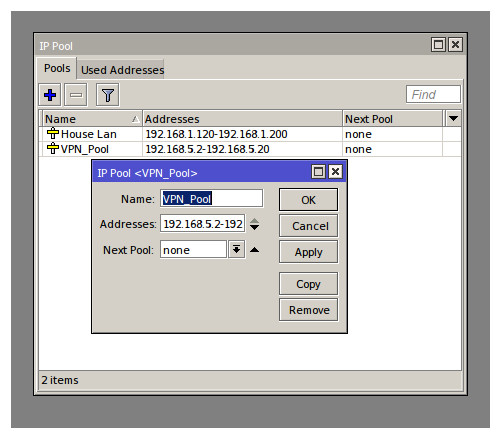
Lets start with the server side (the CRS 125-24G-1S), on here we need to set it up for L2TP connections along with configuring the firewall to allow such connections and also we need to configure the server to supply the VPN with valid IP addresses (can set a single static entry if required). Step one is to create a set (Pool) of usable IP address for any incoming VPN connections, once logged in via Winbox navigate to IP then to Pool. You should see your existing DHCP pool in this new window, we need to create a completely separate pool on a different subnet to segregate internal traffic from VPN traffic. Click the plus icon and give the new pool a meaningful name and type a new address range e.g 192.168.5.2-192.168.5.20 .
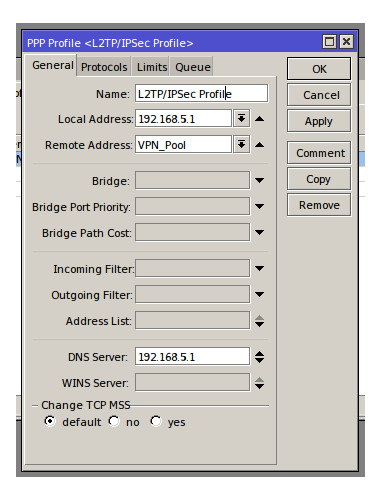
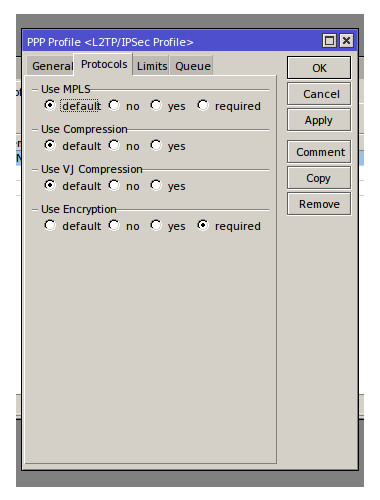
Next we need to create a Profile for the L2TP connection to use, the purpose of a profile is to correctly set up incoming and authenticated VPN connections with the right details such as assigned IP address/Local address/DNS details and if any encryption or compression is required. The connections profiles tab can be found in the PPP menu, the 2 default profiles can be edited to suit our needs but for the purposes of this HowTo I shall create a new profile. Click the plus icon and give the new profile a meaningful name e.g. L2TP/IPSec Profile, the local address will be the first IP address of the subnet used in the VPN IP Pool in my example this is 192.168.5.1 (this address should not be in the IP Pool). The remote address should be set to use the IP Pool we created earlier, the drop down menu can be used to access all IP Pools. The last field that need to be filled in the DNS server this should be the same as the local address e.g. 192.168.5.1 (this address will be identified as the routers own address once a VPN is established). Lastly select the Protocols tab and ensure that under ‘Use Encryption’ the required option is selected.
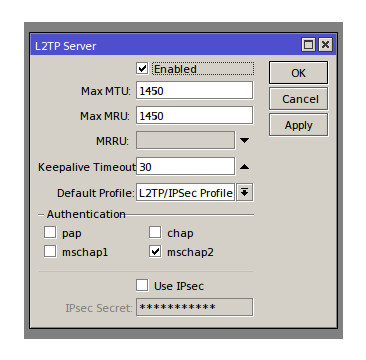
Now we have a profile configured the next step is to enable the L2TP server option, this can be done in the PPP menu under the Interfaces tab by simply selecting the ‘L2TP Server’ button. Make sure enabled is selected in the L2TP server window and the ‘Default Profile’ is set to the profile we have just created and that ‘mschap2’ is selected as the authentication option (most secure option available), IPsec can be left alone at this point as the 2 Mikrotiks will encrypt the connection using AES 256-bit (IPSec will be introduced in the next VPN Blog).
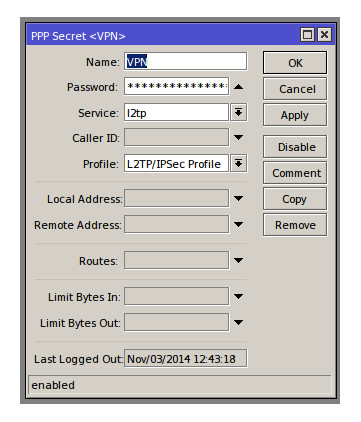
Before we can set-up the client side for a connection we need to create a VPN user account, to do this navigate to ‘Secrets’ in the PPP menu and click the + to create a new user. For the purposes of this how to my User will have a name of VPN with the profile set to the profile we created earlier and the service set to L2TP, a password will also have to be entered for the user.
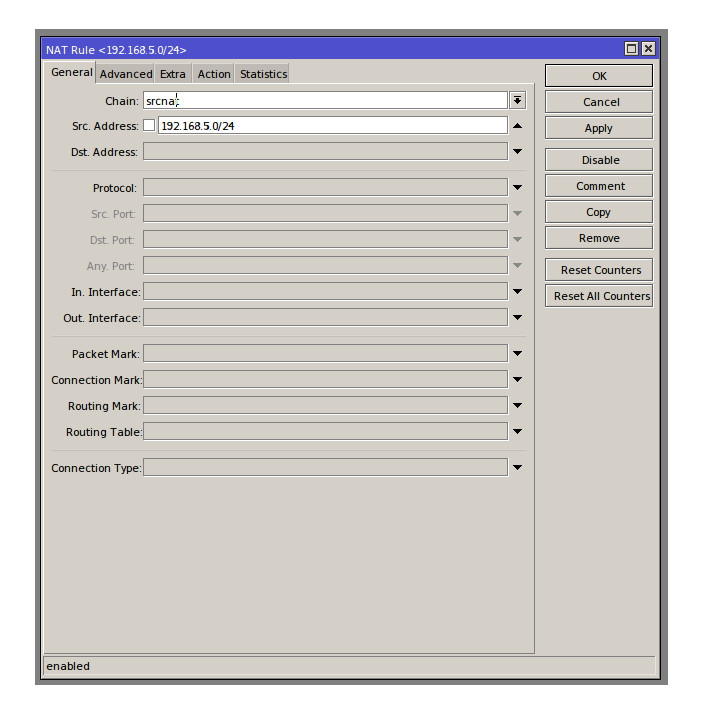
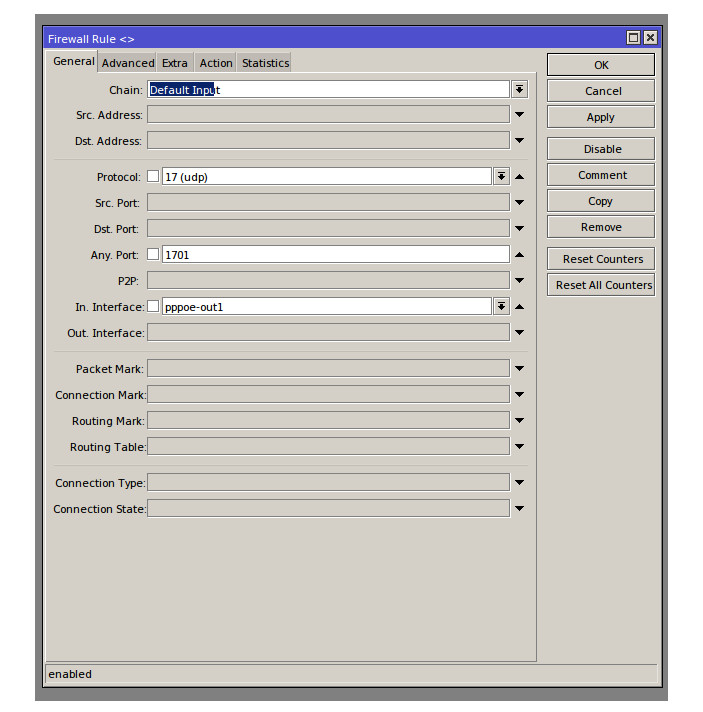
The server now has all the information needed to authenticate and assign a connection the appropriate IP details but we are missing one final component to making this connection work as expected and that is our Firewall. The firewall will need to be configured to accept the ports related to a L2TP connection and be able to NAT the in coming connection for internet sharing. The main firewall rule for allowing a L2TP connection will be set on the Input chain with UDP set and the Port number to 1701, the action will be accept. The Nat rule needed is a simple srcnat rule to masquerade all the IP’s in in the VPN pool subnet, in my configuration the src’ address would be 192.168.5.0/24 meaning any addresses with a 192.168.5,x will be masqueraded.
The server side is now ready.
Client Side
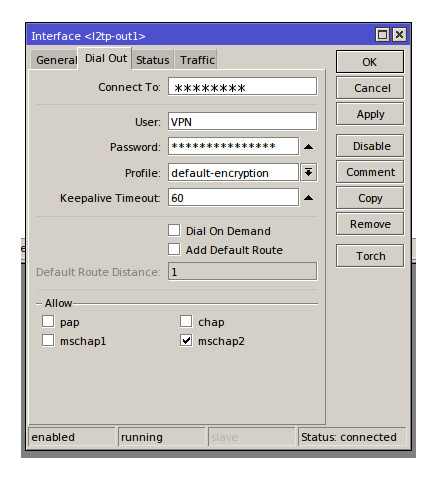
The client side set-up is very simple, I will be assuming that your client Mikrotik is fully operation and has internet access. The first and last step to configuring the client side for a VPN connection to the server is to enter the connection details into a L2TP client interface. On the Client MikroTik, in this case the mAP, select PPP from the menu and then the + in the interfaces tab, a list of possible interfaces will now be displayed, select ‘L2TP Client’. A new window will open, you can enter a meaningful name for the connection in the ‘General’ tab, in the ‘Dial Out’ enter your user account details (set-up in secrets on the server side) into the User and password field and ensure that ‘mschap2’ is selected. The ‘Connect To:’ section need to be filled in with the server sides public facing IP address or DNS friendly name (it has been been blanked in the image below for security reasons. To find your public IP address click this link whilst on the server side (MyIP).
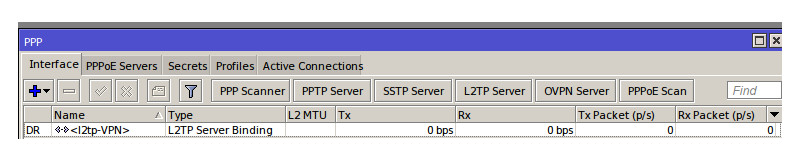
Once apply is clicked the VPN should fire straight up and connect, this can be verified by clicking on the status tab on the newly created interface. You can also see if a connection is up by logging in to the server Mikrotik and loading up the PPP menu, you will see an interface with the type ‘L2TP Server Binding’ which shows an active L2TP connection.
The Mikrotik Server used in this how to can be found here, along with the mAP which can be found here. For Hardware encryption Mikrotik routers check out part 1.5 for a quick guide to set up Mikrotik to Mikrotik IPsec VPN.
Stay tuned for our next how to which will be focusing on IPSec and creating secure VPN from the 3 major operating systems and phones to a MikroTik device.


Thanks for the tutorial !
A friend of mine creates openvpn VPNs and makes EoIP tunnels go through them which allows him to have layer 2 access to the remote boxes, if you know how to do that would make a great tutorial though super technical
I guess if you have a l2tp connection going between the two routers you can just setup the eoip tinnel usein g the ip assigned to the connections
Hi, Can’t find the second part, have you written it yet?
“Stay tuned for our next how to which will be focusing on IPSec and creating secure VPN from the 3 major operating systems and phones to a MikroTik device. “
Thanks for the tutorial looking forwar to the ios mobile side, have been trying this without any luck ;-(
What happened to part 2??
please keep stuff like this coming
Thanks
Part 2 is in the Works and will hopefully be finished in the next couple of weeks 😀
Thanks, and still waithing for part 2 😉
great!, thanks for the tips
Thanks for sharing this useful information. I was looking for it since long time. Perfect solution.