 LinITX Blog Ubiquiti & MikroTik Wireless Networking Experts

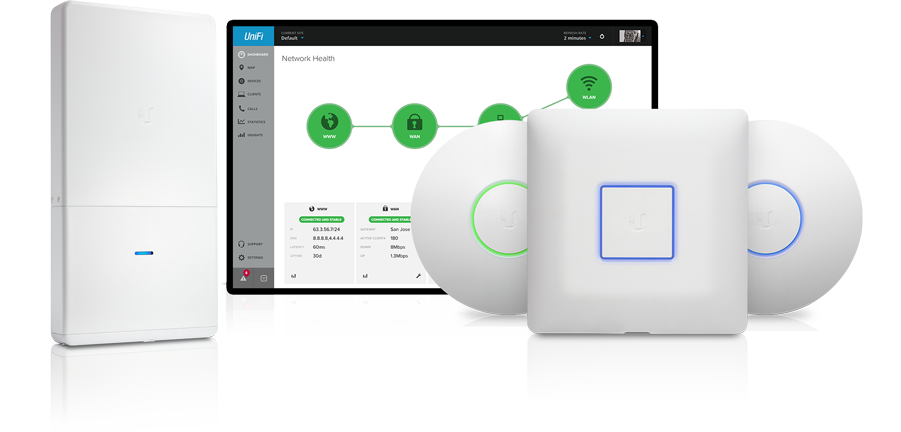
In this “HowTo” we will go through the steps of managing a Ubiquiti UniFi access point, the same process applies to the UAP, UAP LR, UAP Pro, UAP AC, and the UAP outdoor series of products. We will be using a pair of the new LinITX Embedded Controllers hosting Ubiquiti’s UniFi Controller. Both Version 3 and the new Beta Version 4 Unifi Controller will be included in this “HowTo”. Guest Portal will not be covered.
What is the UniFi Controller
The UniFi Controller is a Ubiquiti product made freely available on the UBNT website for the express purpose of controlling their range of UniFi products, version 4 includes switches and phones. Ubiquiti’s controller is a software based controller as opposed to Cisco and Ruckus whose controllers are hardware based. The UniFi controller is also license free.
This saves money on additional hardware as it could be installed on any “spare PC” and you will also not incur any extra license costs for the use of multiple UniFi Products.
In some cases however, a hardware solution is the only option. For these occasions we have developed the LinITX Controller range for use with the UniFi Products. The controller is primarily used to configure the UniFi Products for first time use and is also essential for guest portal access, as all unauthenticated HTTPS and HTTPS requests can then be routed via the controller. We recommend an always-on controller accompanies any installation of UniFi products as it will help prevent down time and keep the Unifi Products up to date with any setting changes, firmware updates and provide a wealth of useful diagnostics data in an easy to read graphical format.
Connecting a Unifi Device
All Unifi Devices including the range of UAP’s all come with a matching POE power brick as standard and a power cord (If purchased from linITX you will get a UK power lead free). To plug in a and power up a Unifi device you will need to plug an Ethernet lead into the port marked POE on the power brick and then into the Port marked Main on the Unifi Device (if the Unifi has a single Ethernet port then use this). Next use a second Ethernet lead and plug it into the port marked LAN on the POE power brick and plug the other end into your switch/router. Ensure you laptop is plugged into the same switch/router before you continue.
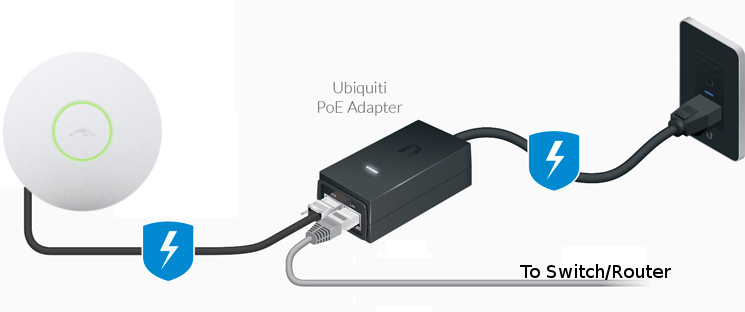
If you are using a TOUGHSwitch or UnifiSwitch you do not need the POE Brick but ensure the port Voltage is set correctly before plugging in a Unifi Device. Power voltages can be found on the product page on LinITX.com.
Setting up the controller
Step 1
Once the controller is downloaded and installed from the UBNT website some minor configurations will be required before any UniFi configuration can be done. Navigate to the controller’s IP address to begin this will either your computer’s IP addrss or the hardware Controllers IP addres, provided via DHCP. Open your web browser and type the following, replacing IP address with the appropriate address.
https://IPaddress:8443
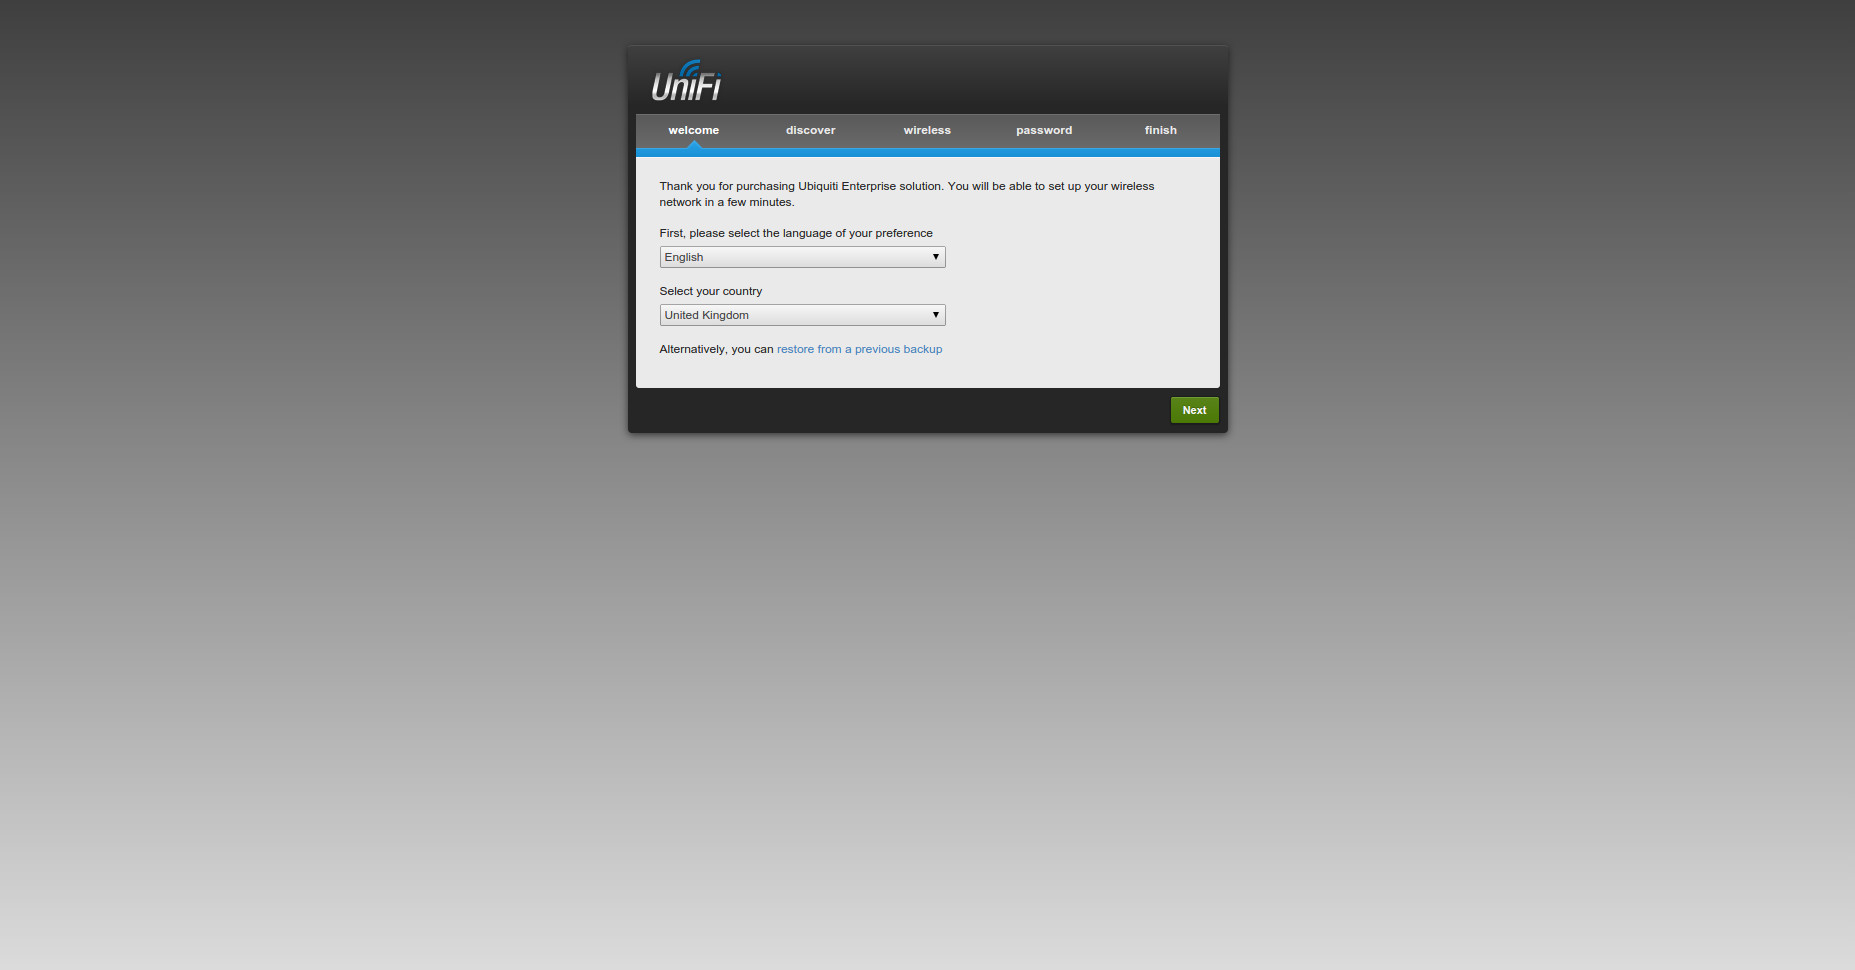
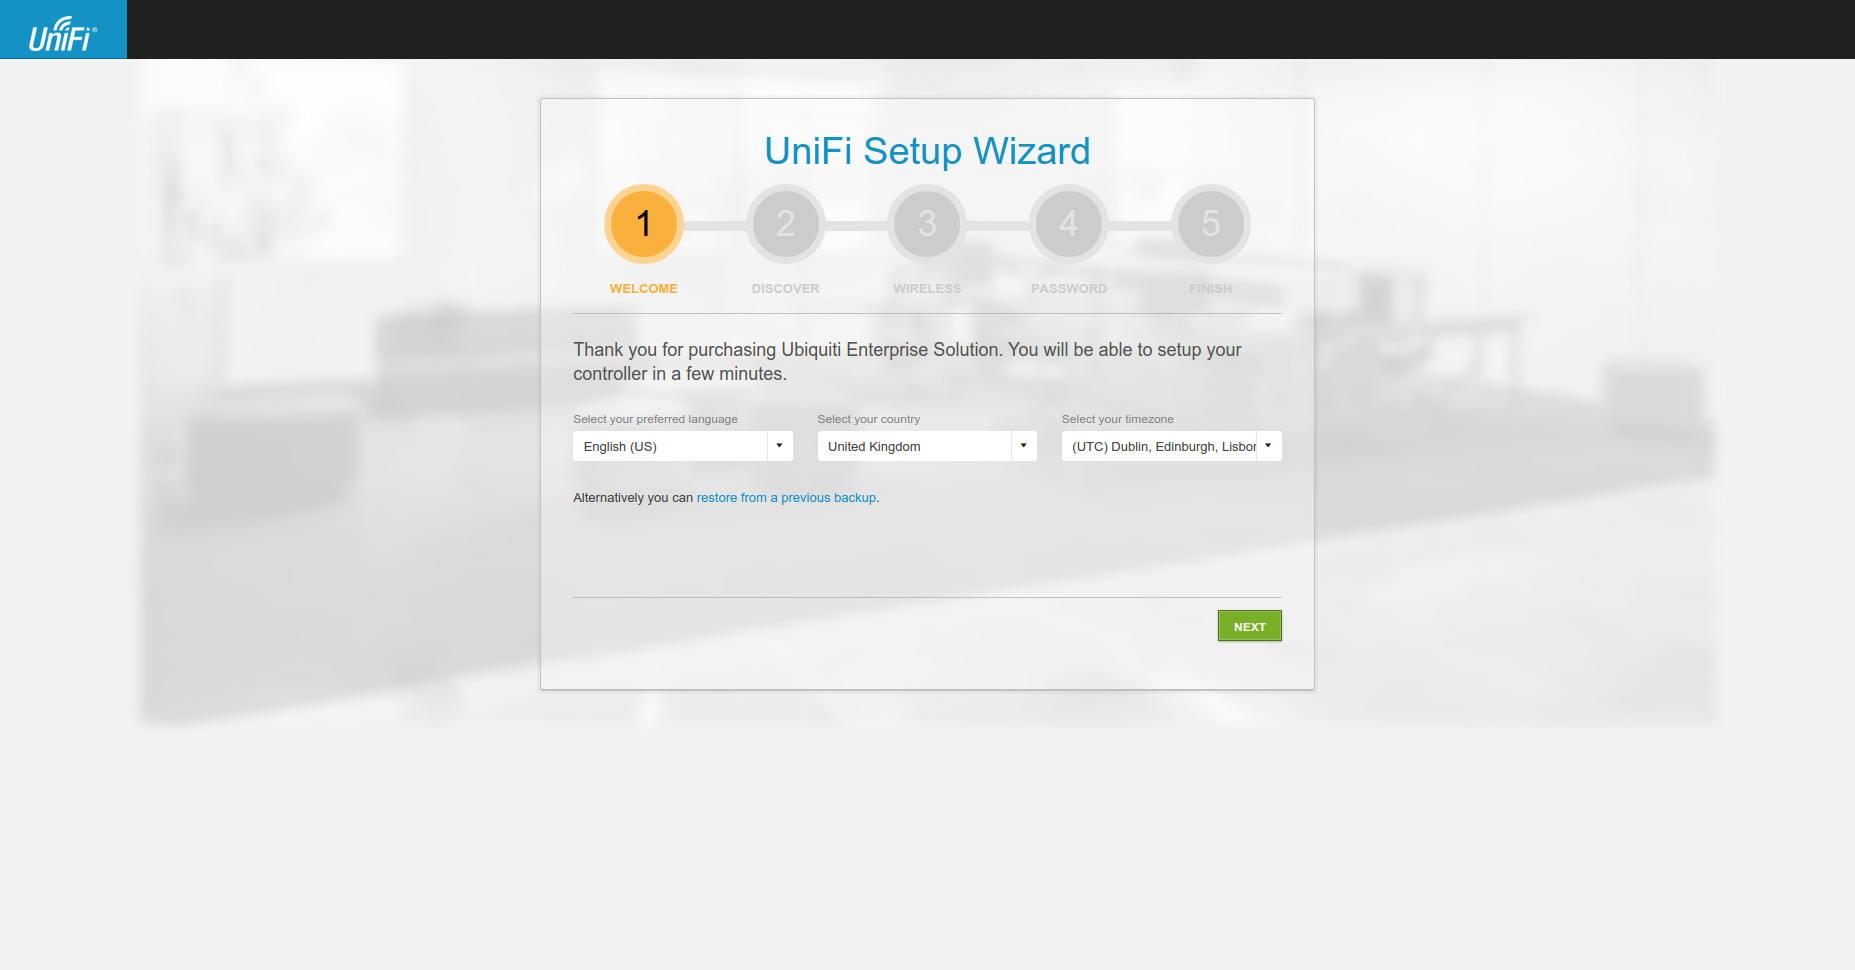
Once loaded you will see the welcome screen. Ensure that the correct country is entered for where the site will be deployed as this will determine what channels are permitted in that country and at what maximum power levels the UniFi wireless products will use making sure sure they are legal for use. The time zone will need to be entered for V4.
(V3 Left, V4 Right)
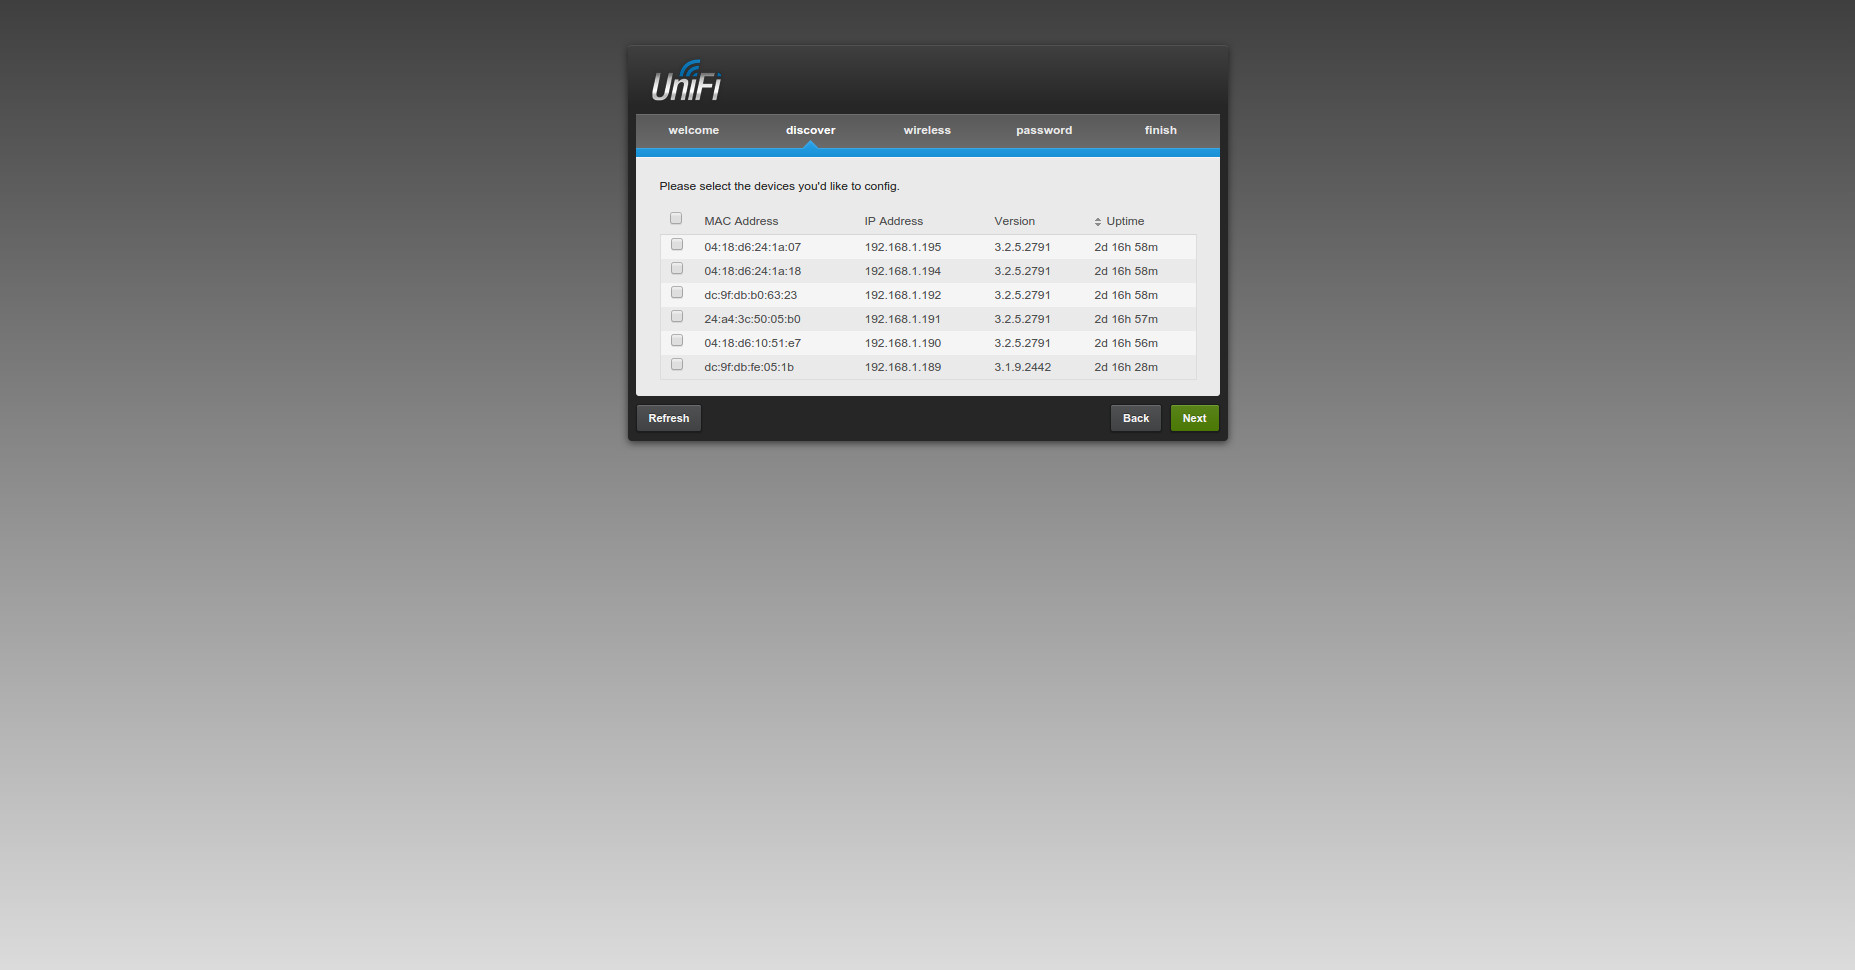
Step 2 is the discovery stage – any Ubiquiti UAPs on the network that are ready to be adopted will appear here, it is not essential to adopt them at this stage. Click Next.

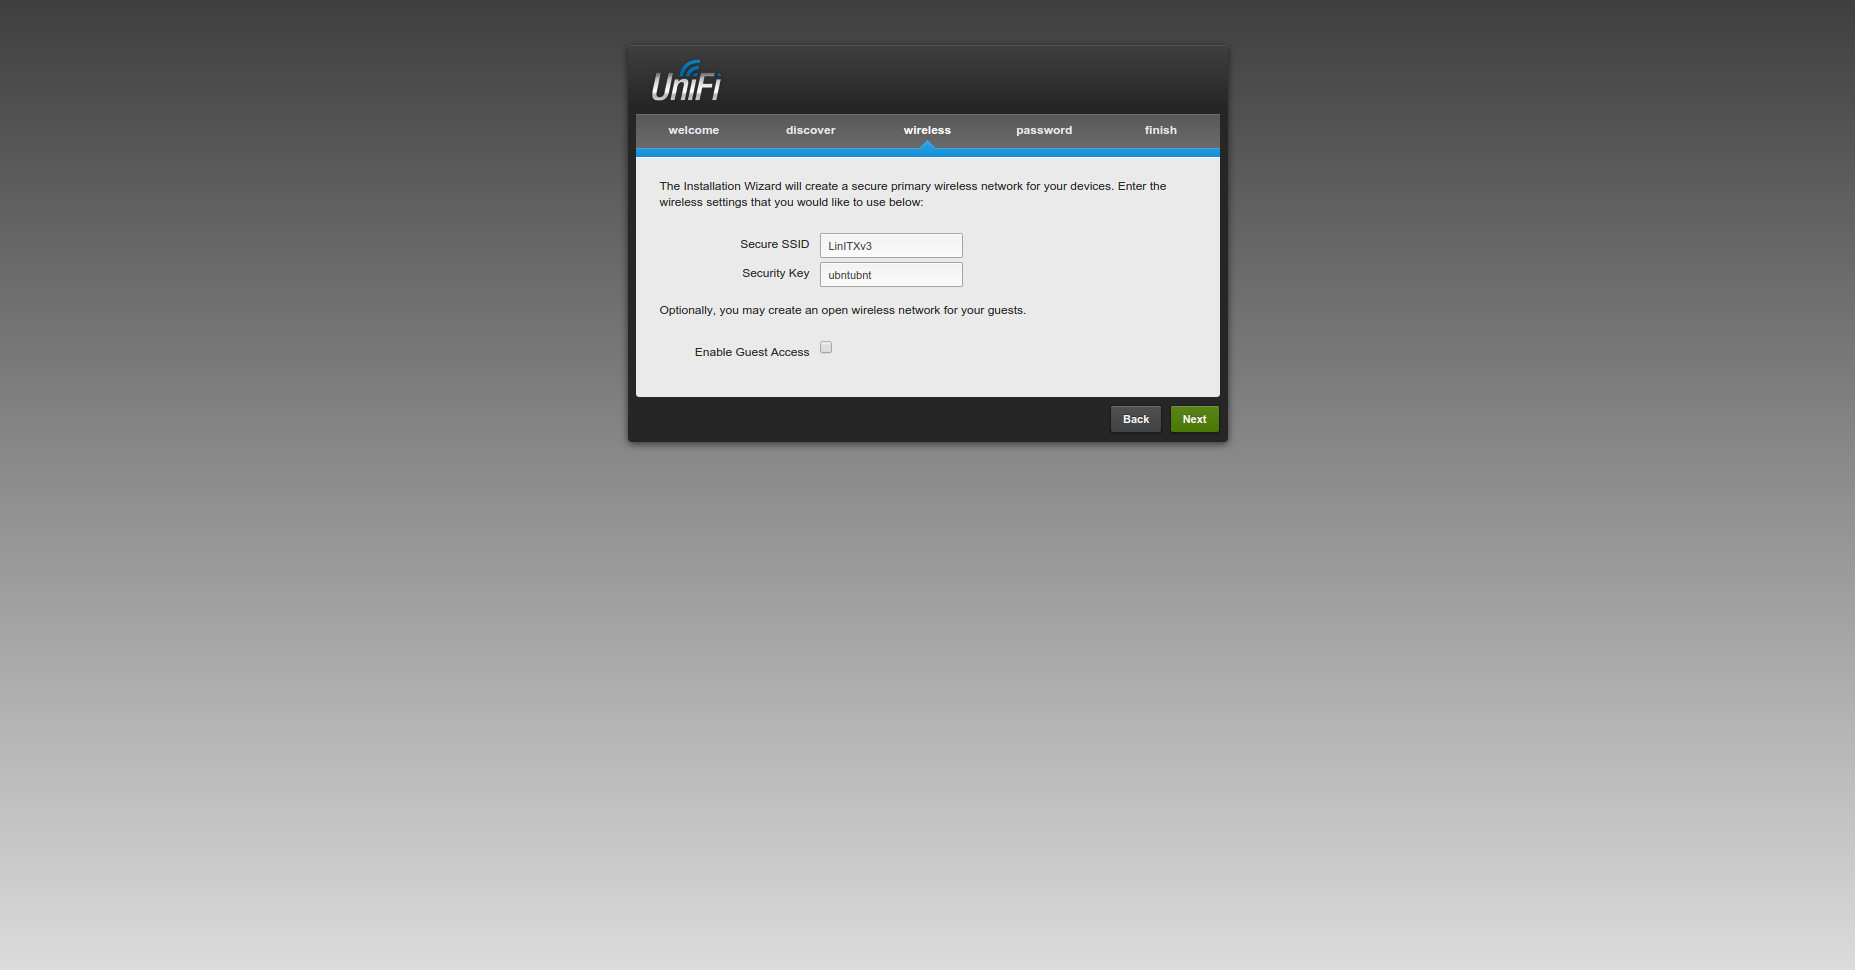
Step 3 is where we choose what the first WiFi SSID will be named along with the connection password. Enter a desired WiFi SSID Name and password and select Next. This ensures that your network remains secure as, when an AP is provisioned, it will take the SSID setting and begin broadcasting it.

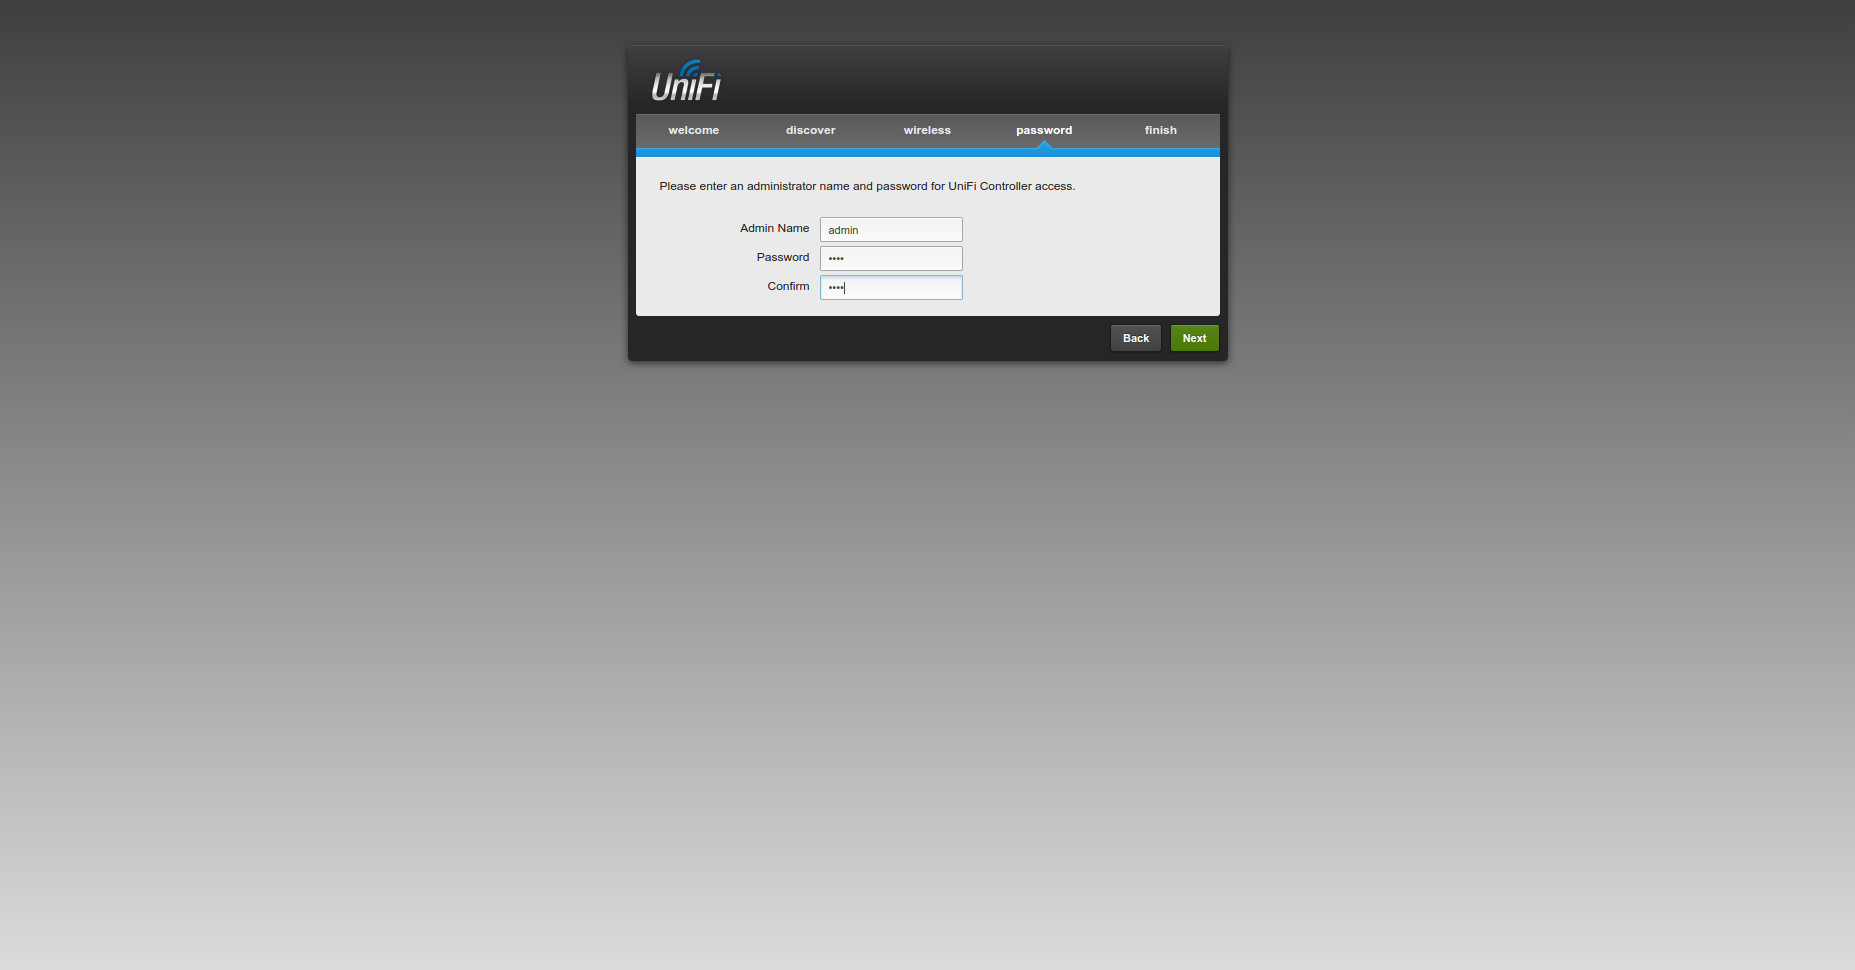
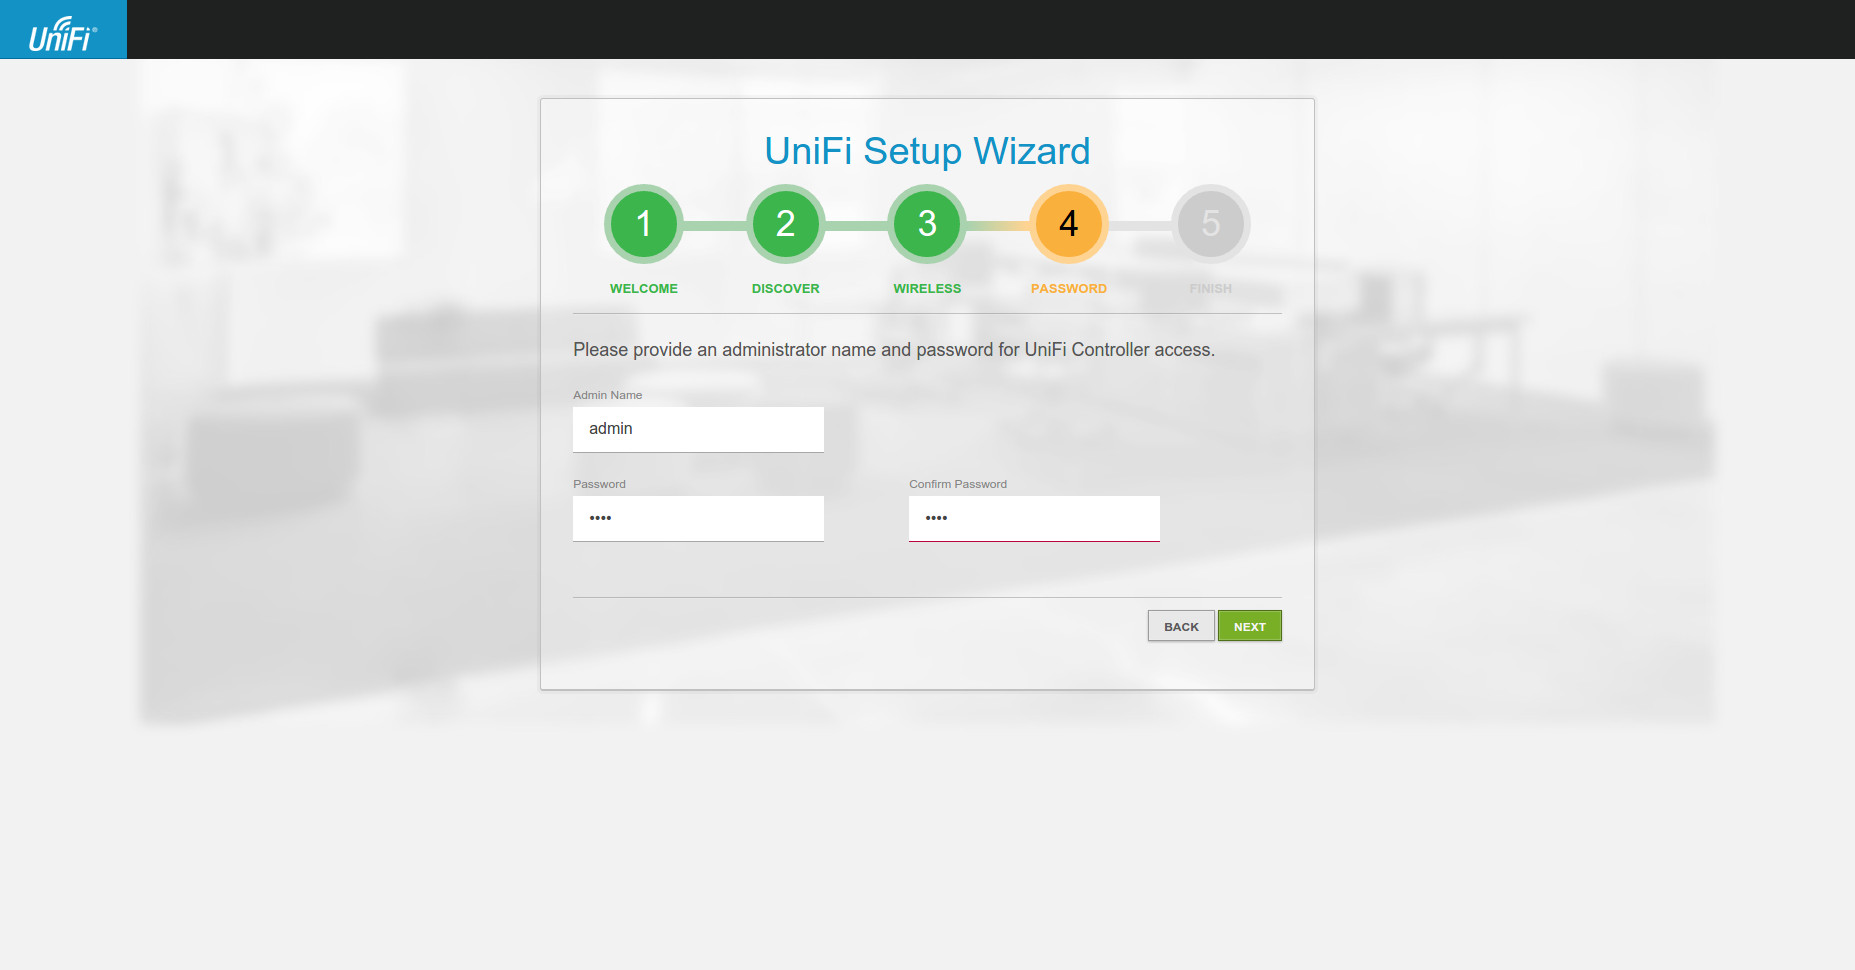
Step 4 this is where we create the admin account and password for use when logging into the UniFi Controller. Enter your desired admin name and password followed by next, then finish to confirm.
After you have confirmed all previous details by selecting finish you will be taken to the UniFi Controller login page, just enter the user name and password you entered in step 4 to login and proceed. You will be greeted with the controller landing page. Version 3 and version 4 of the controller have very different landing pages.

Setting up a Site
A Site is essentially a unique workspace within the controller which represents a physical location, this feature can be very useful in mixed business buildings with a single IT infrastructure but want to keep separate WiFi networks. This feature is even more important in cloud (layer 3) style deployments of UniFi equipment where a different site could represent a completely different geographical location or even a completely different customer. A default site is set up as standard which is more than suitable for home or single business deployments. I will highlight below the steps to configuring the default site by adding new users and creating multiple WiFi Networks.
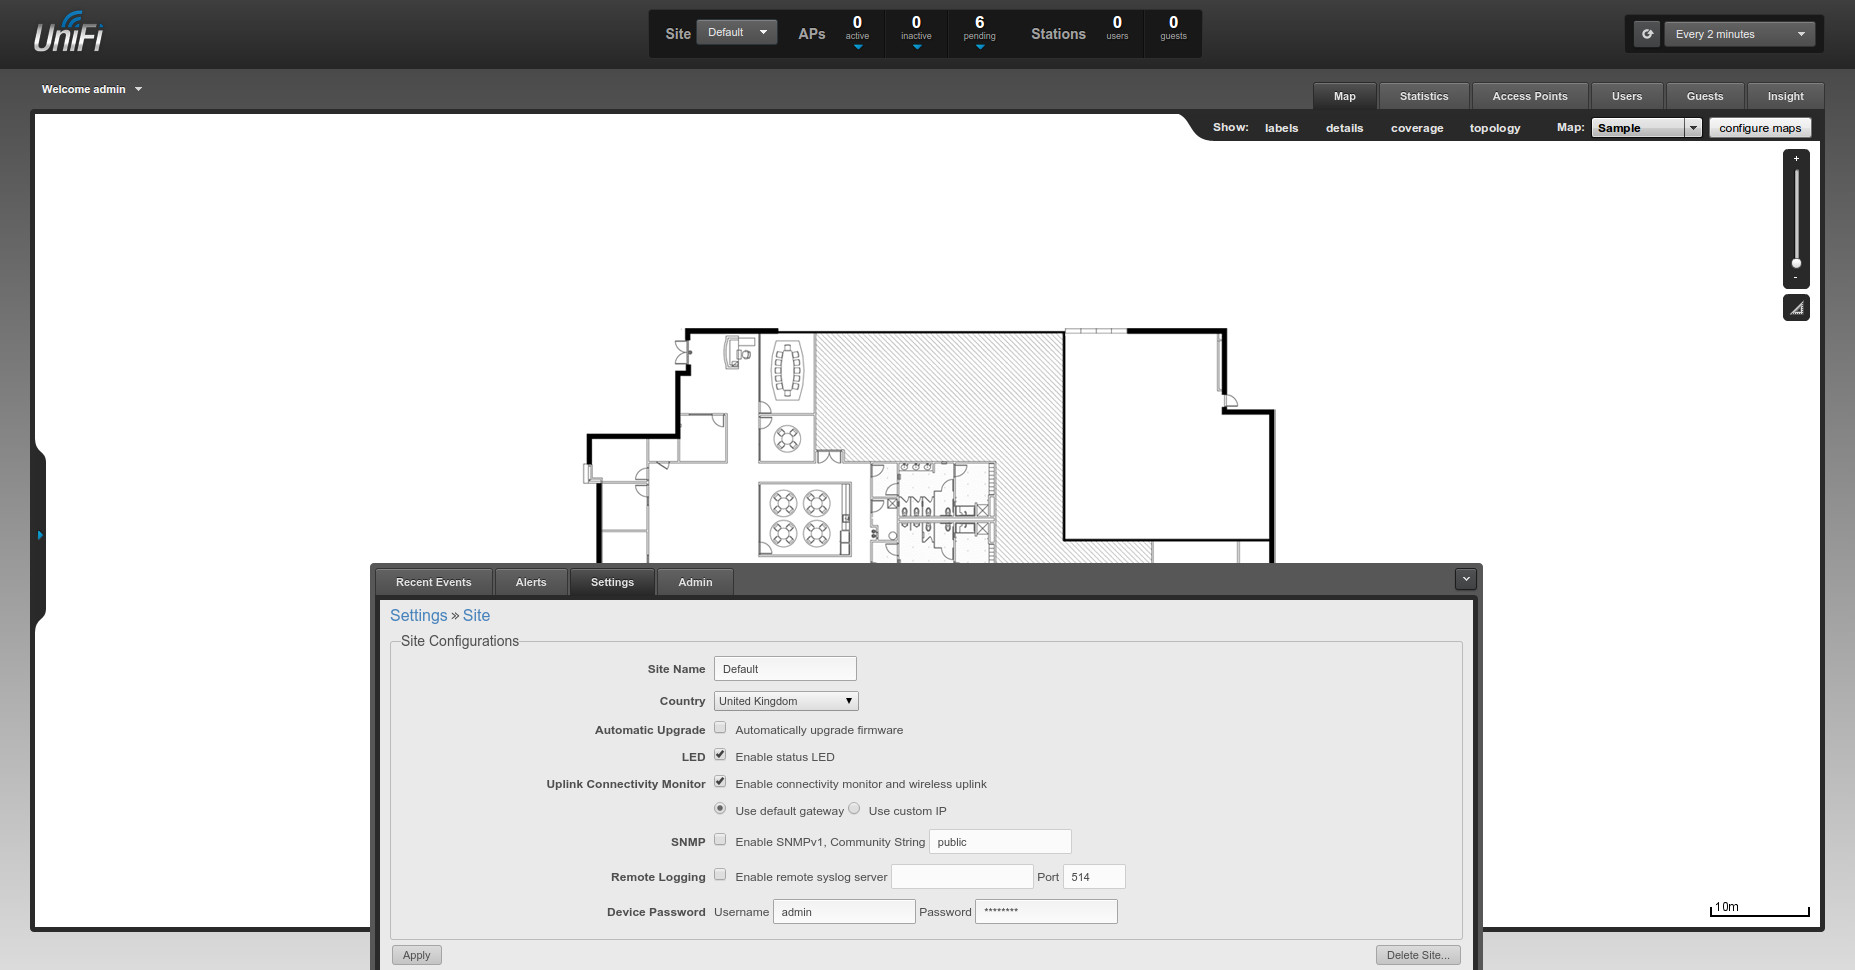
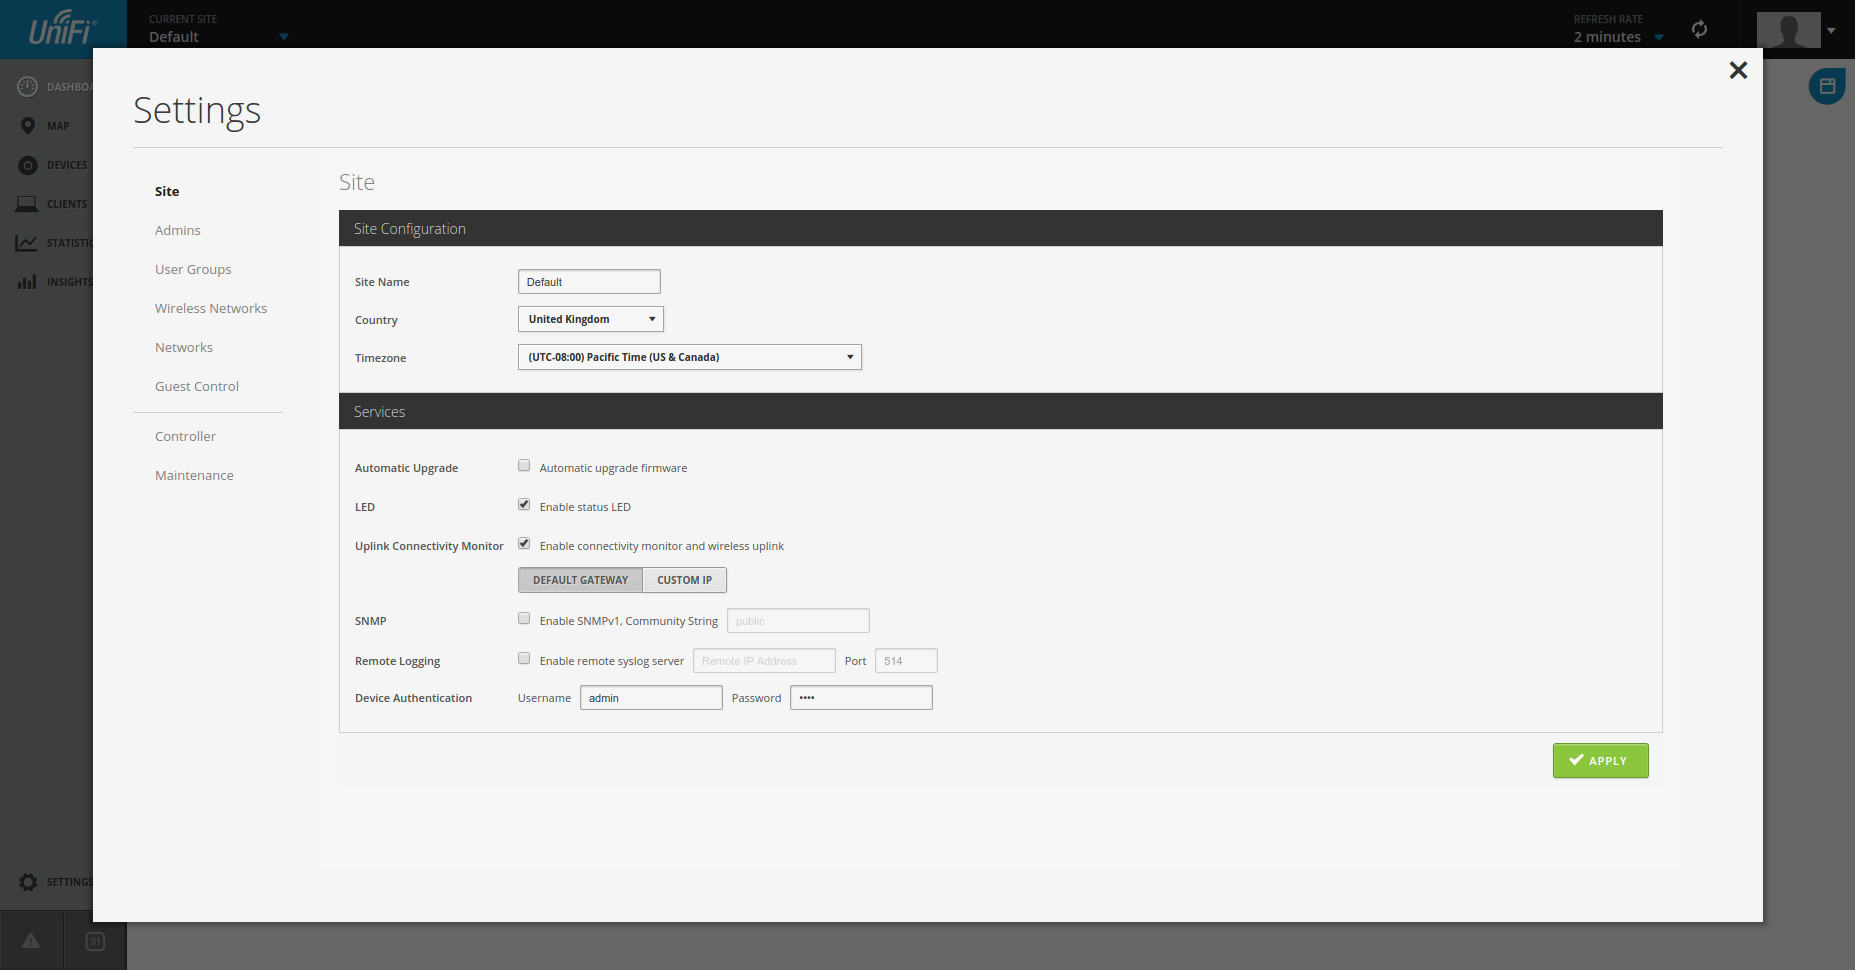
Step 1 is to access the settings panel for the site, this can be found at the bottom of the page on V3 or bottom left on V4 , select site in the settings menu (V4 will open to site automatically). This site page will allow us to edit the site name and time zone if it was incorrectly entered before, auto upgrading can also be selected although not recommended as it could cause the Unifi products to go down at random times for upgrades. The LED light option on UAP’s can also be toggled here (enable or disabling LED will affect ALL UAPs within a site), this option may be useful if the UAP’s are to be installed in bedrooms.
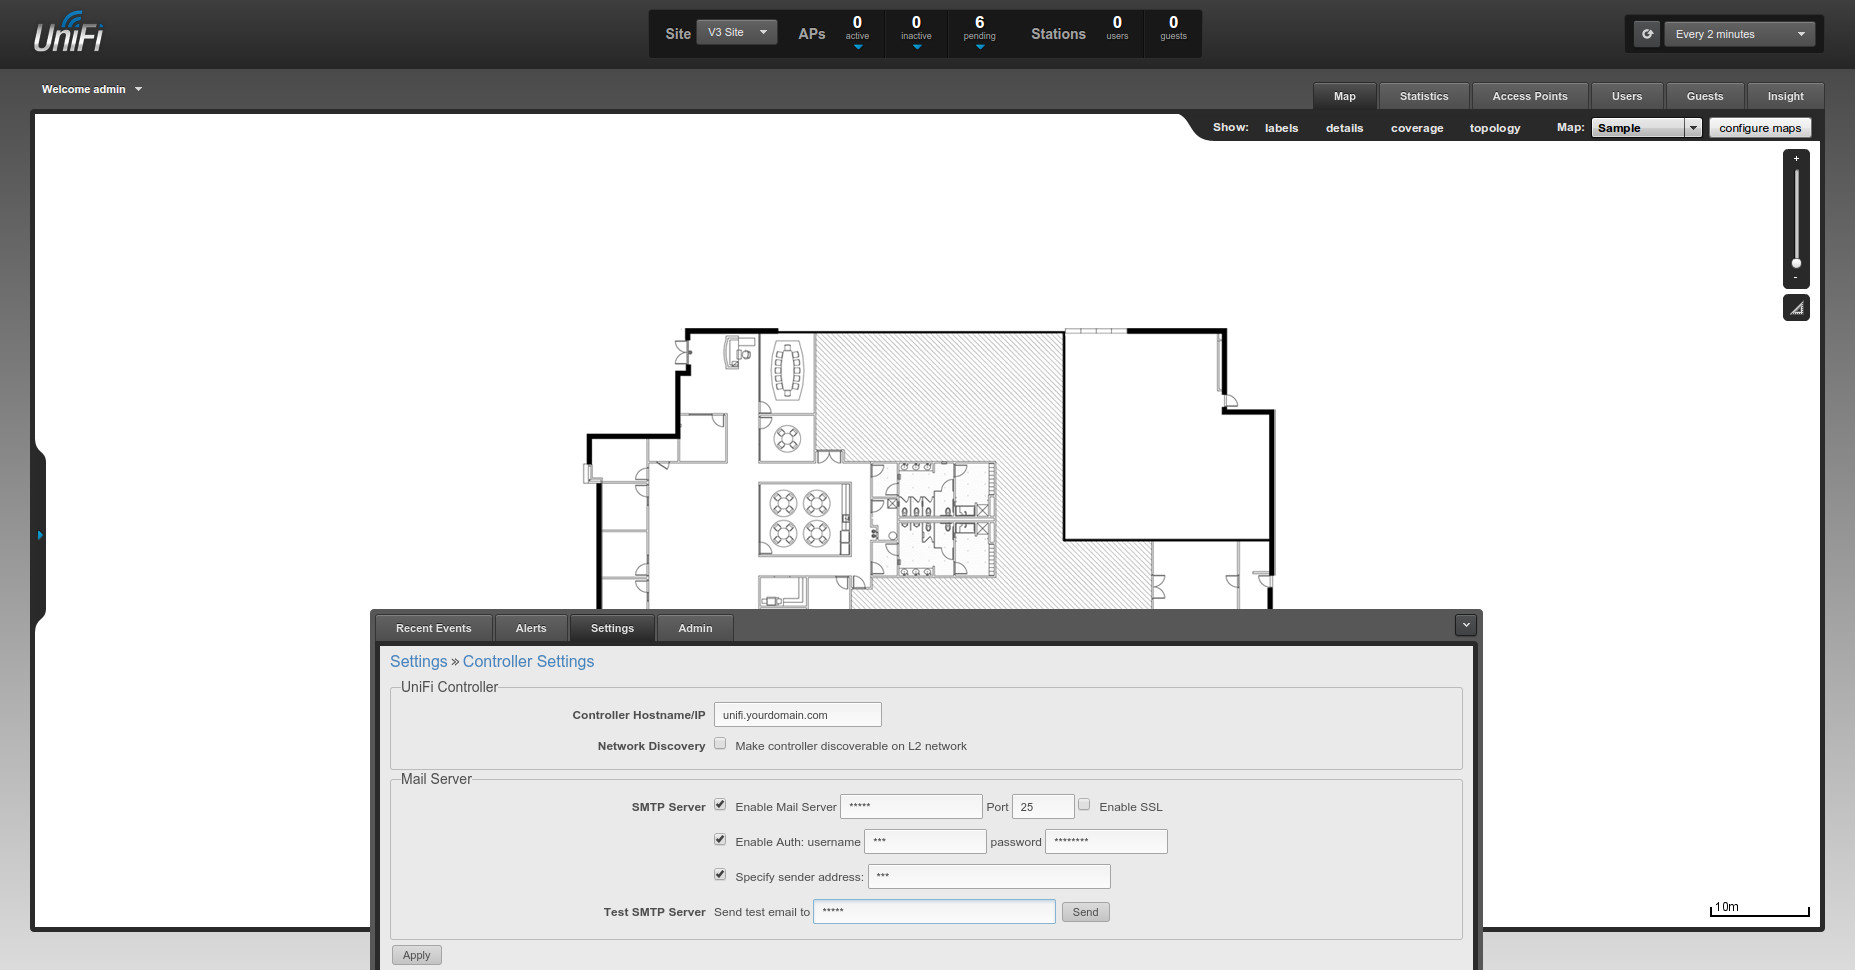
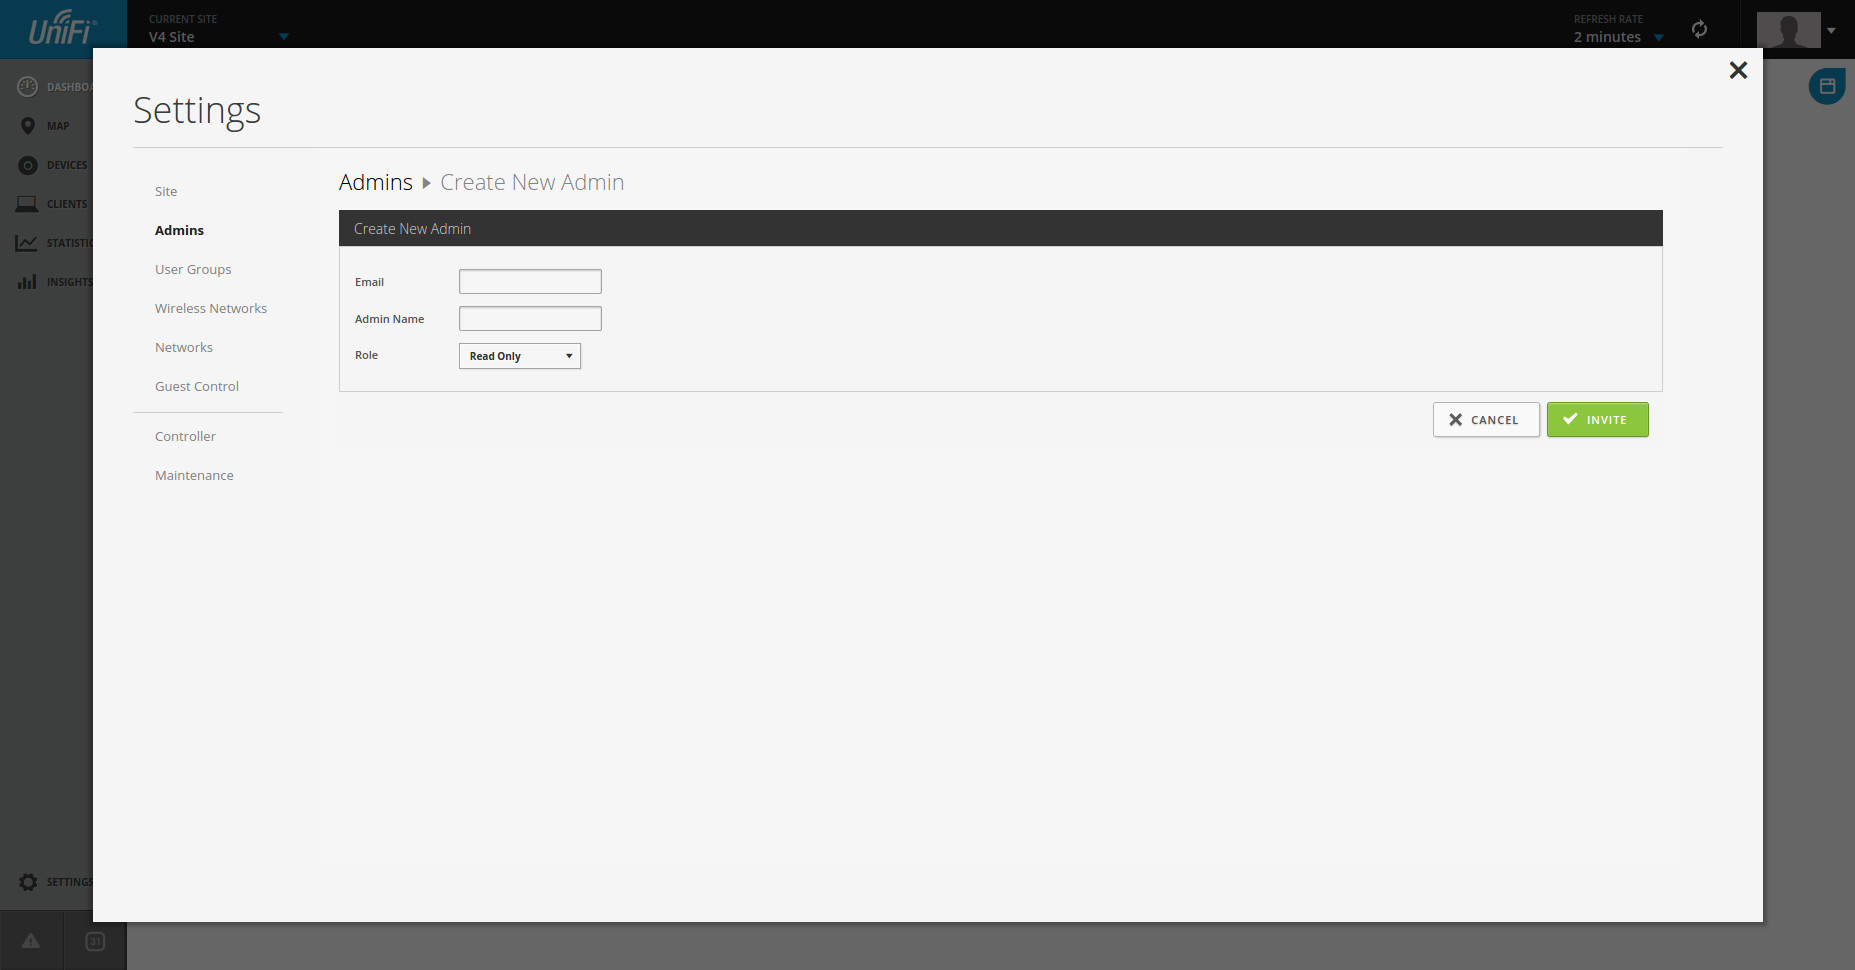
Step 2 is to create new users which can access the Site and can be either read-only for analytical purposes or for full administrator access, to do this you will need have an SMTP server in order for the controller to send email invitations to those users. In order to enter your SMTP details navigate to Controller Settings in the settings menu in V3 and Controller in the settings menu on V4 and enter your SMTP details into the relevant boxes.

Once SMTP server has been configured a new user can be added to the controller by simply selecting Site Admins for the settings menu on V3 or Admins in the settings menu on V4, select Invite or Create New Admin and enter the new users email and login name followed by their privileges which can either be read-only or administrator. The new user will then receive an email with a link to the controller inviting them to log in and finish the account set up. (they will have to be located on the same Layer 2 network as your controller or your external facing router needs to be set up to port forward TCP traffic on port 8443 to the controller.

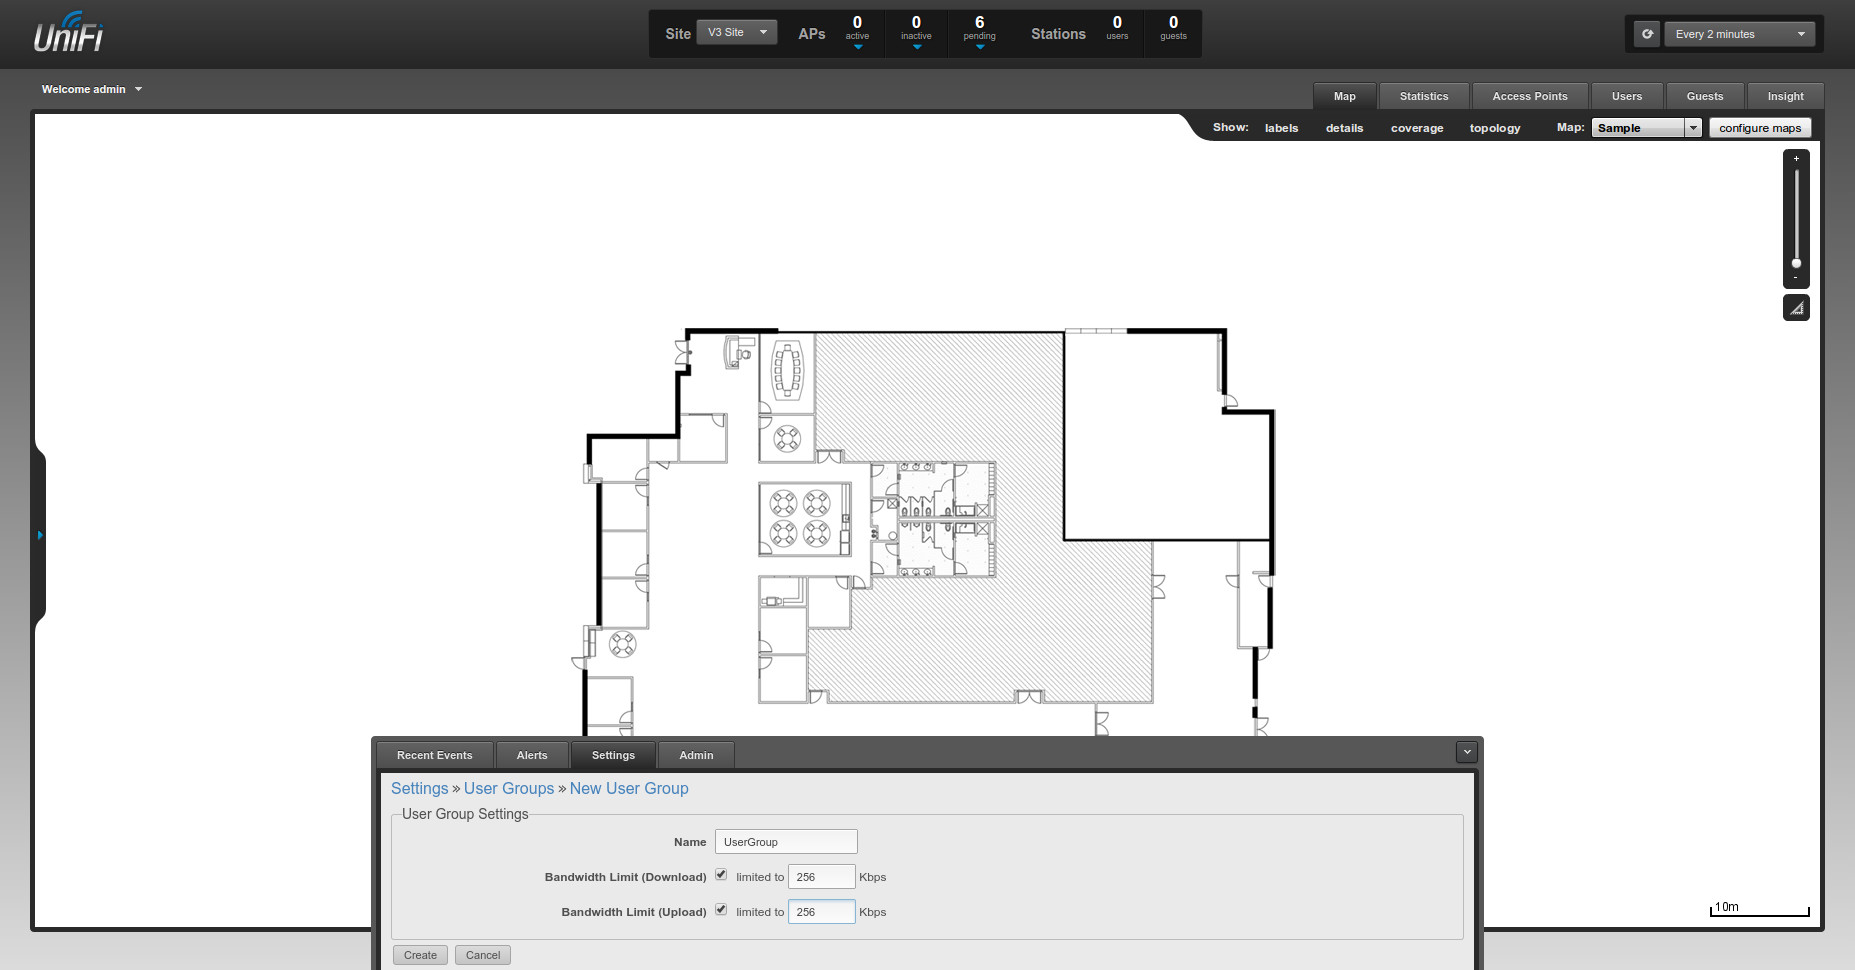
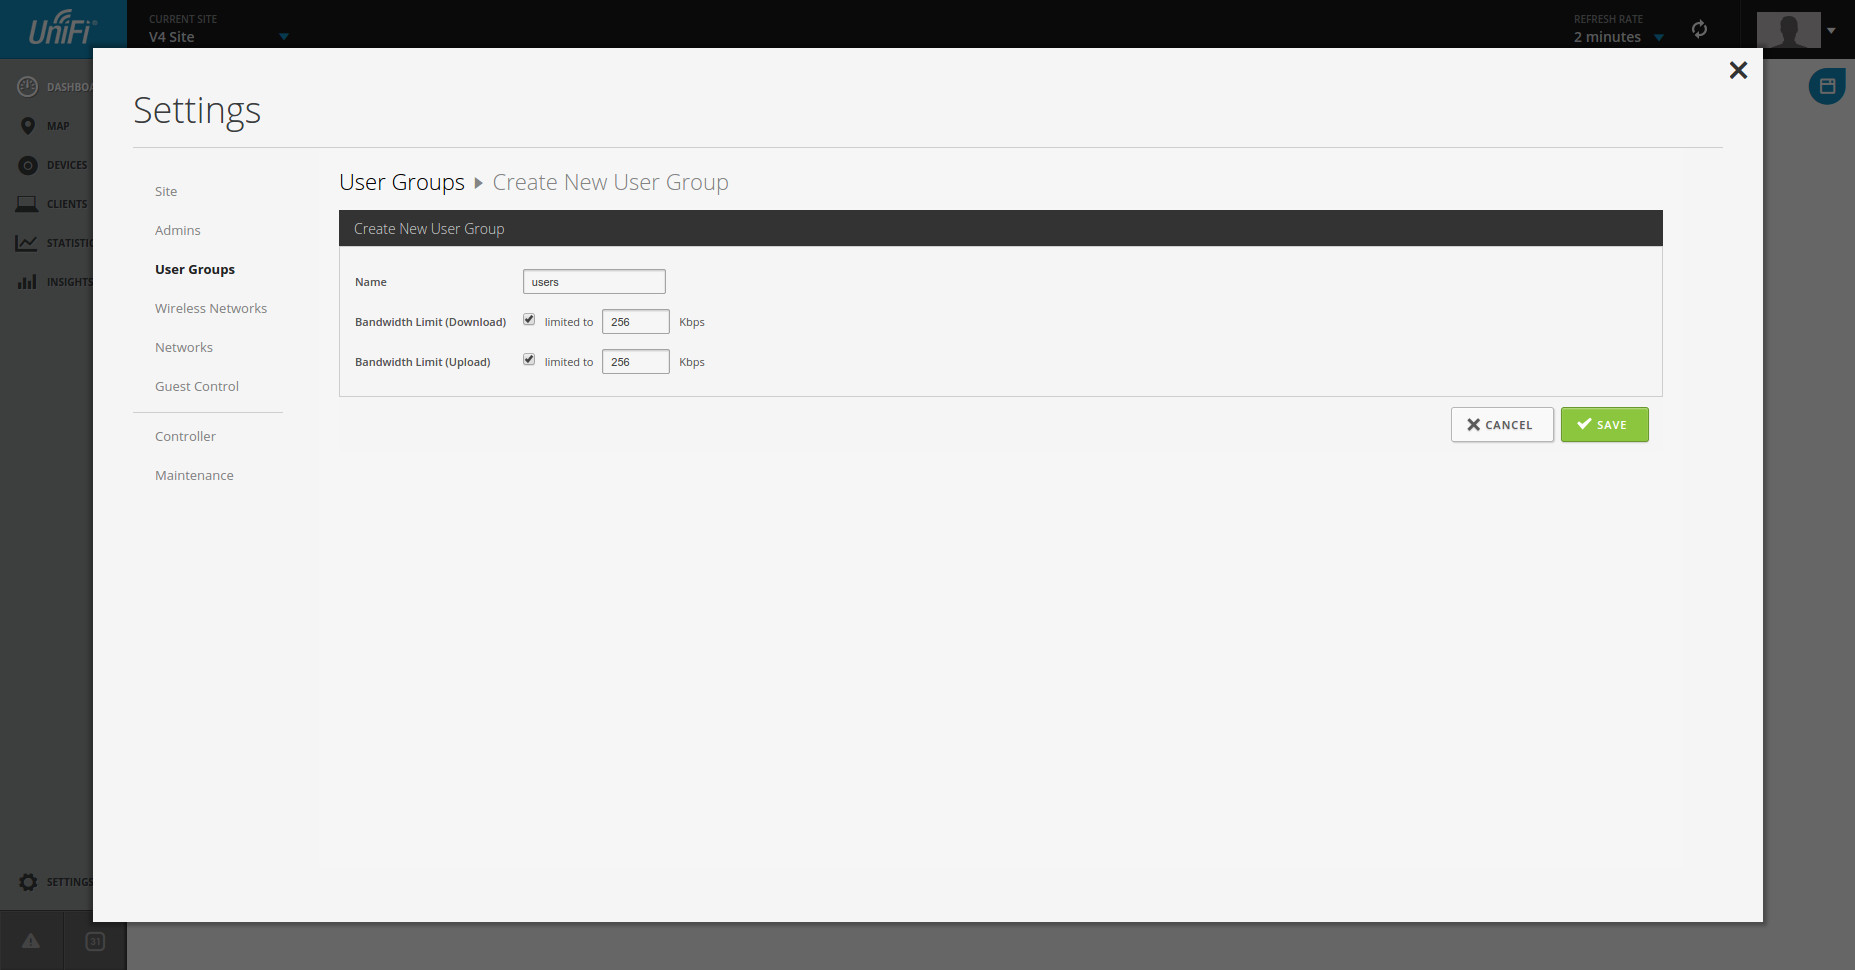
Step 3, User groups can be created to limit the speed of some users and this can help maintain balance on the network and restrict high bandwidth users from pulling down everybody’s speed. To create a new user group select user groups from within the settings menu and create a new group. You can enter bandwidth restrictions at this point. The user group can then be applied to a specific WLAN or to an individual user.
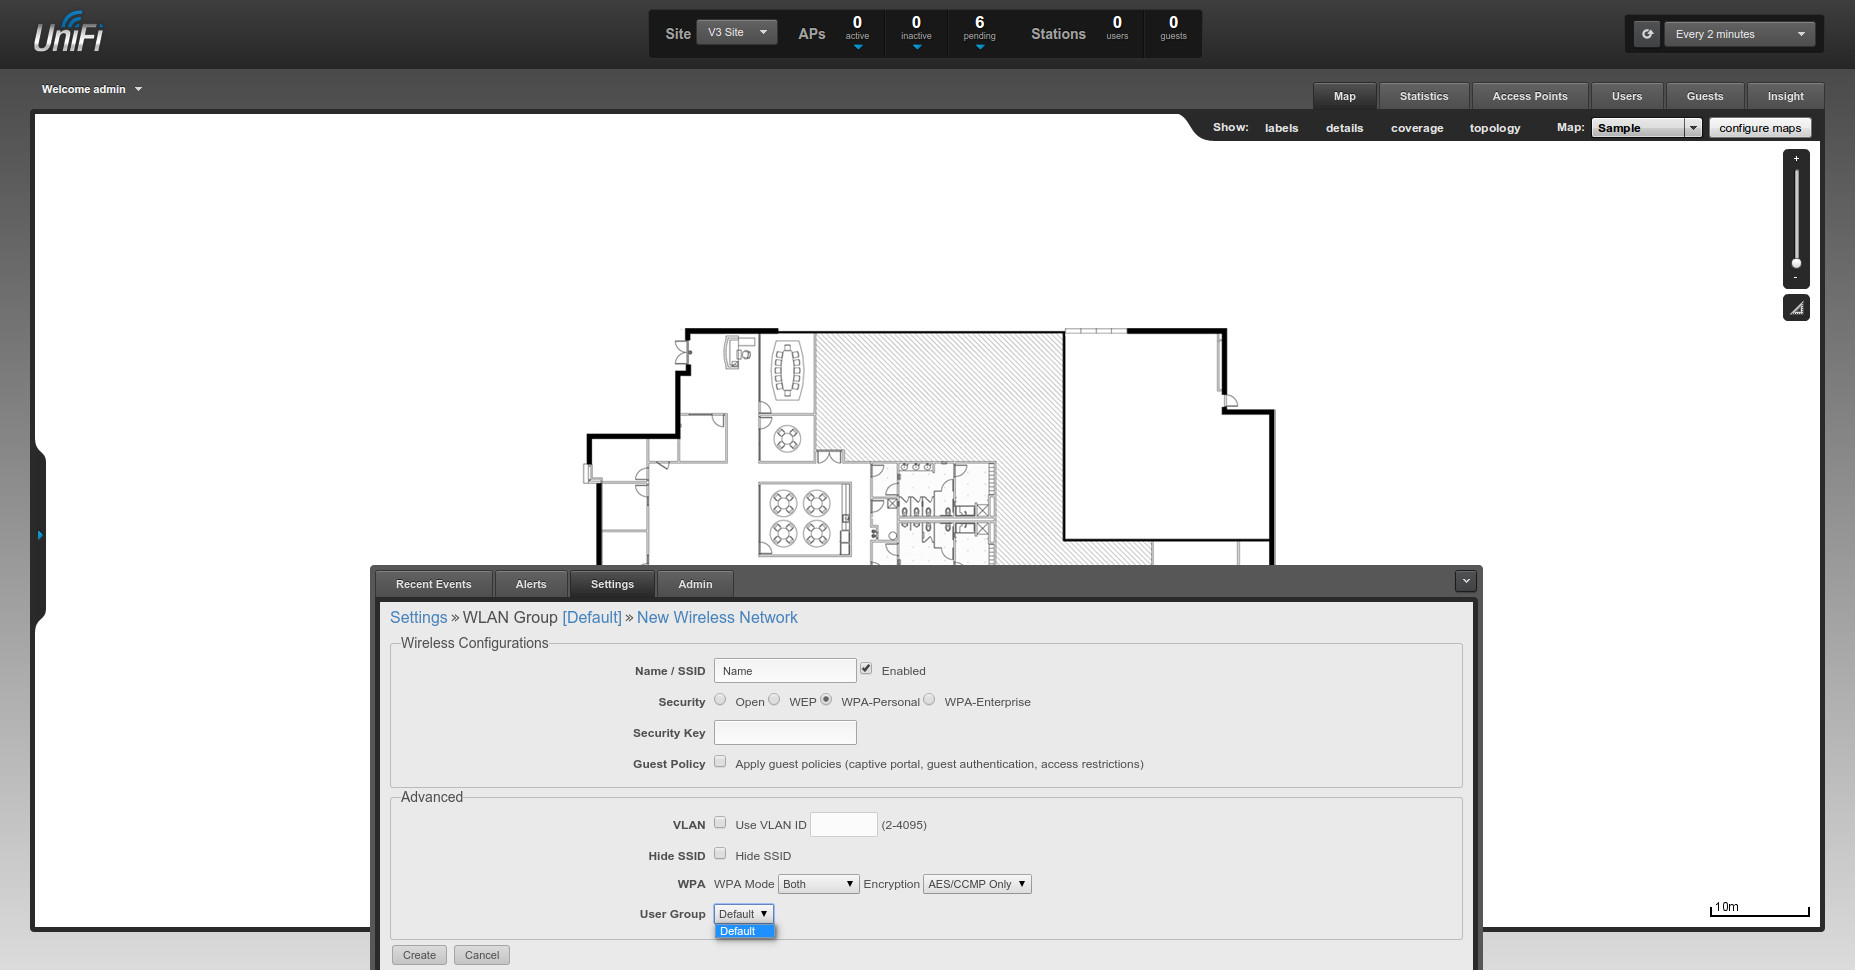
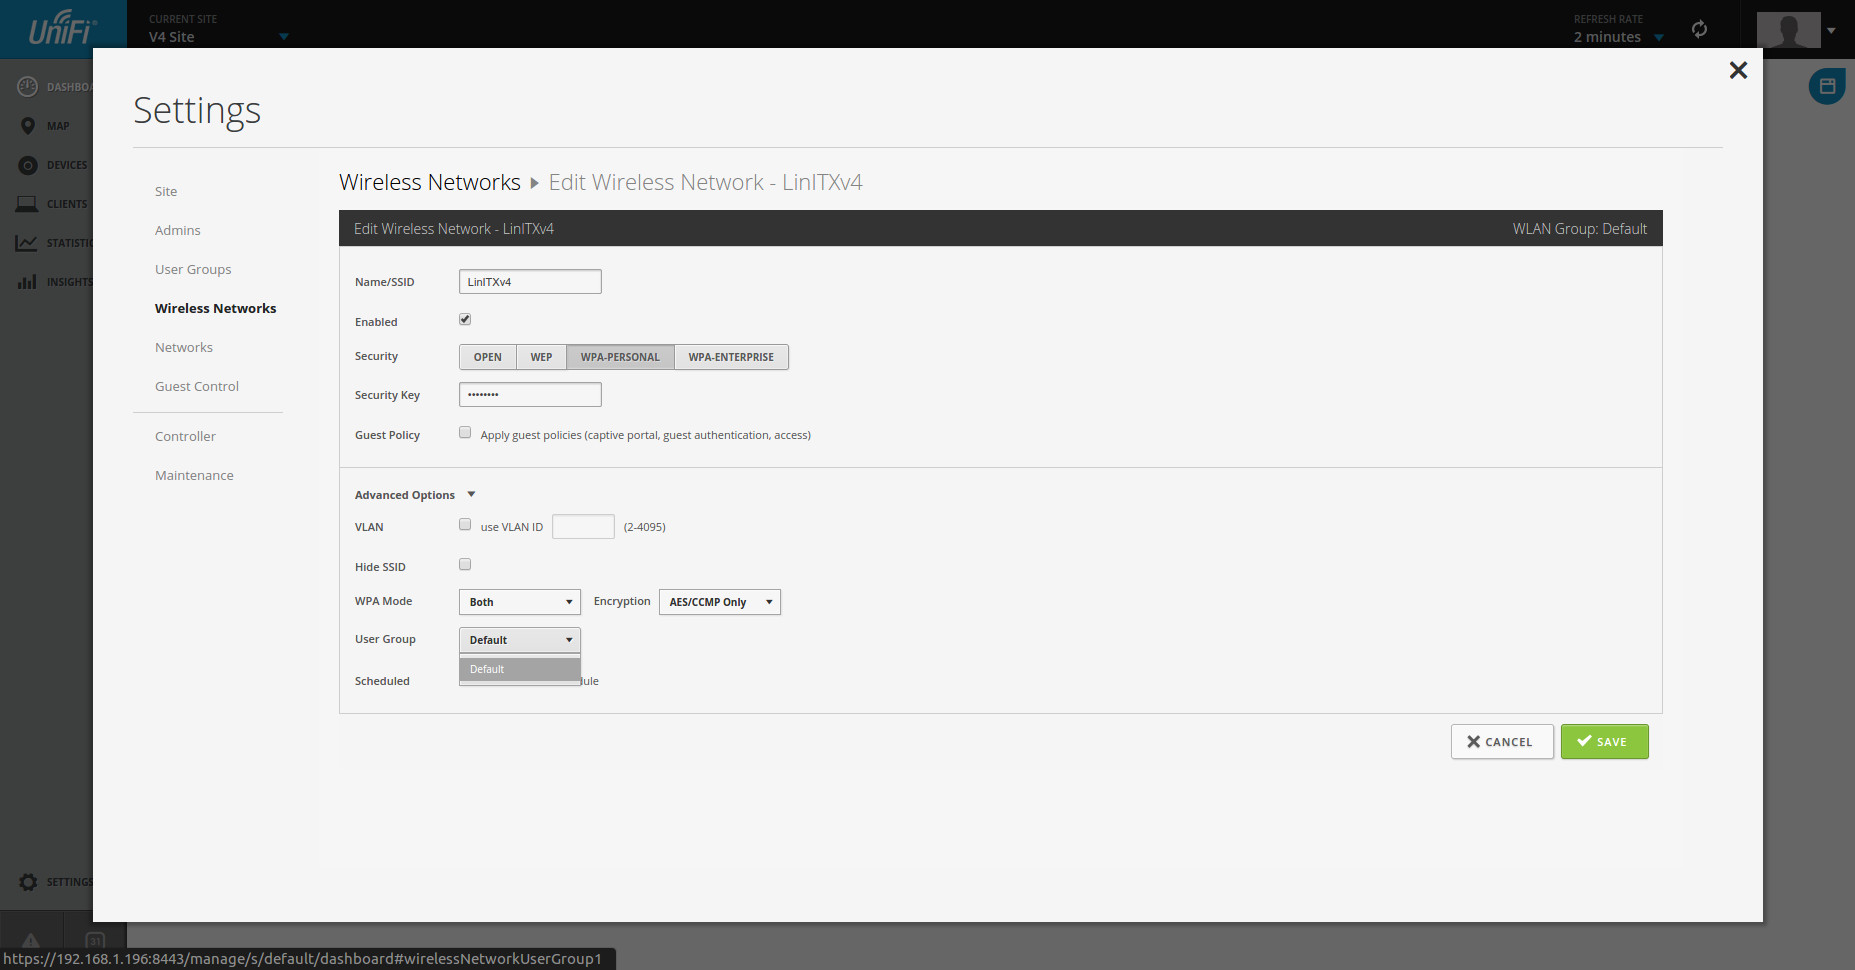
Step 4, Although not essential for home use, in this step we will create another SSID or WLAN to broadcast. A second or third wireless network could be useful when implementing a guest network or segregating wireless users using VLANs (advanced feature which may require a switch supporting VLANs), one very useful feature when creating another WiFi network is that you can assign a user group to the new network restricting speeds for all users on that WiFi. To create a new wireless network go to ‘Wireless Networks’ in the settings menu and select create (V4) and then fill out all the relevant details for the new WiFi including the Usergroup desired following by selecting Create(V3) or apply (V4).
Adopting a UAP
Now that the site is ready we are ready to start adopting UAP’s onto our network, to do this select the ‘Access Points’ tab located top right (V3) or the devices tab followed by AP (V4) this will bring up a list of pending UAP’s waiting to be adopted, UAPs currently adopted or those ‘managed by other’ will appear here.
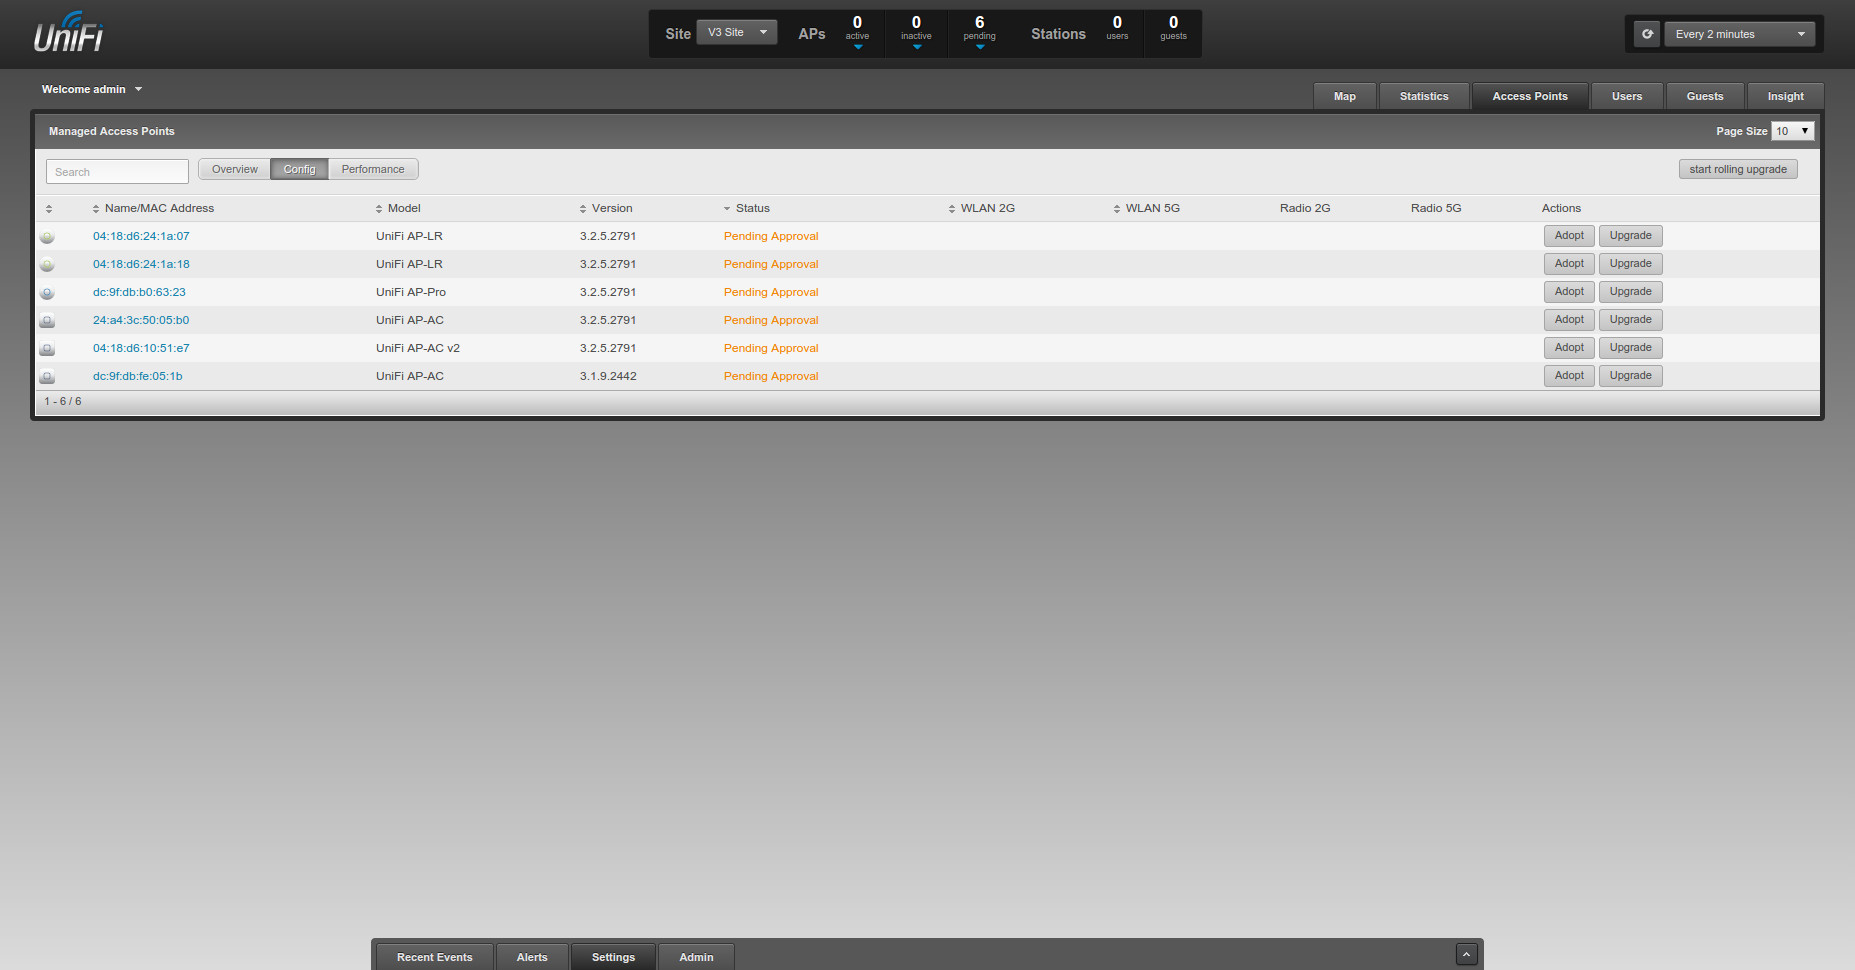
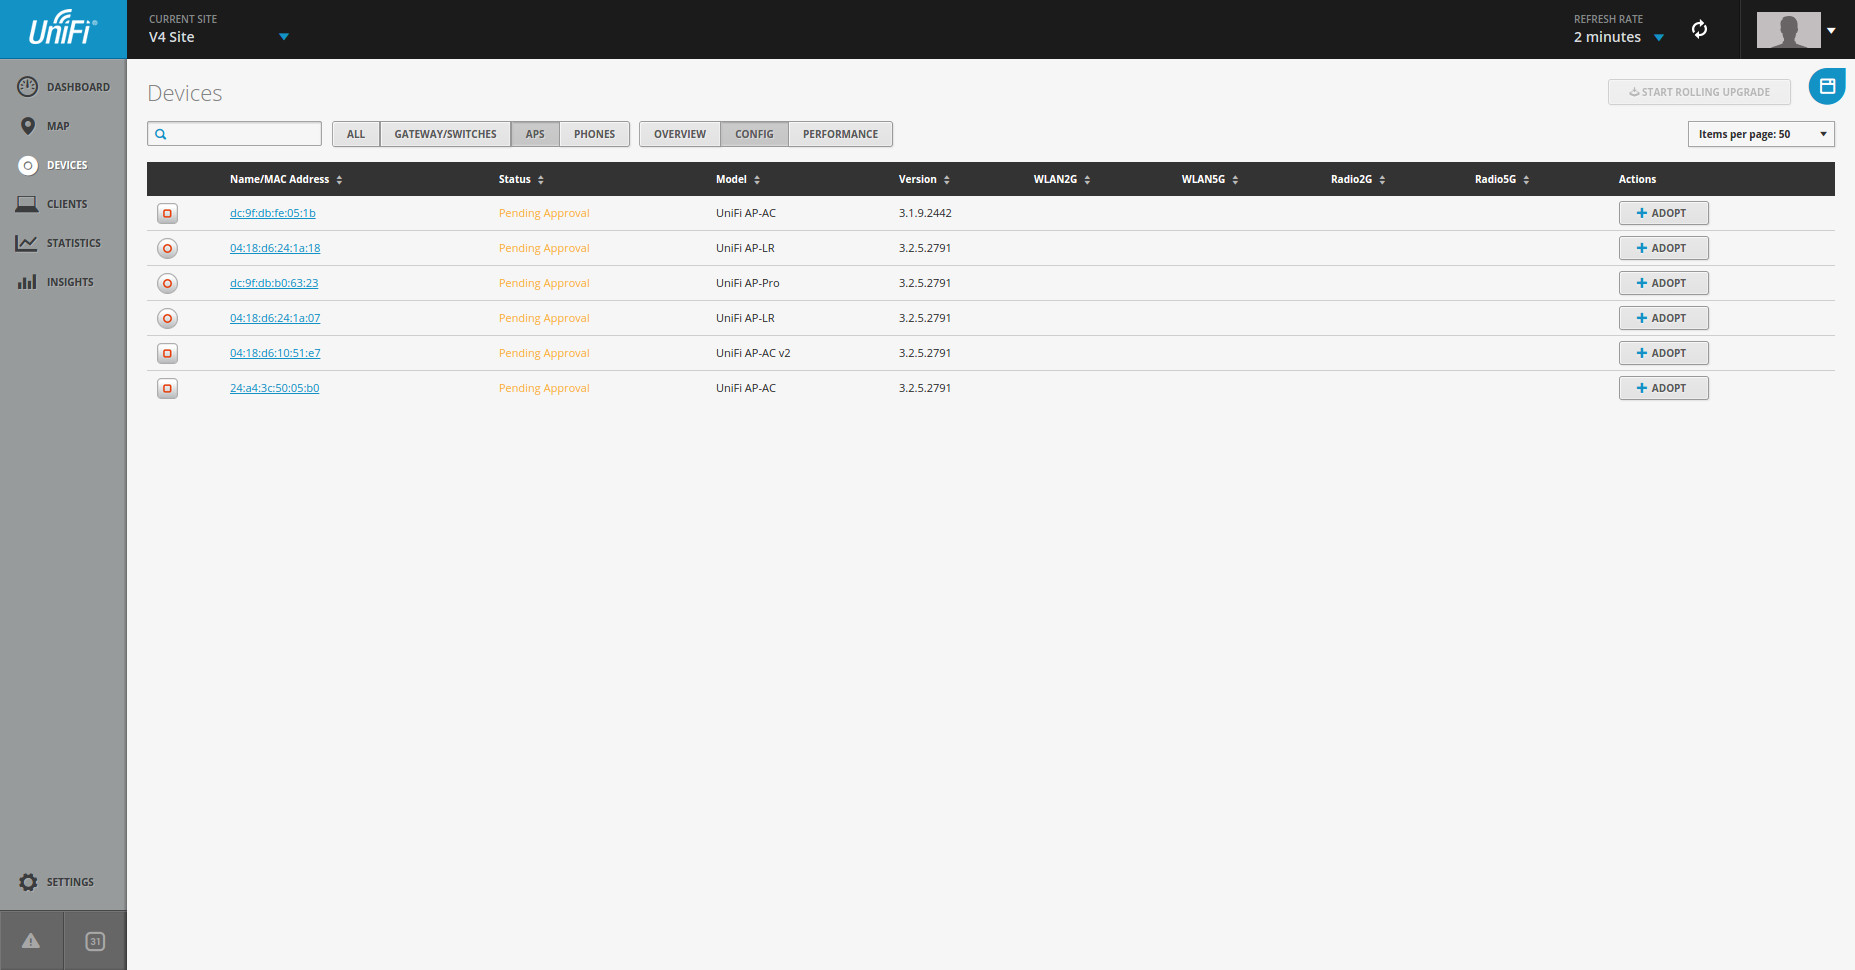
Now that we have a list of available UAPs click the adopt button on those you wish to adopt into this controller. The UAP will change states 3 times. The process should go like this Adopting –> Provisioning –> Connected, if at any point the UAP goes to ‘Disconnected’ something has gone wrong! This can sometimes be caused by DHCP failure or a firmware issue, simply factory reset the UAP using the pin hole on the device by holding in the reset switch for more than 5-6 seconds and try again to adopt the UAP. Once adopted you should have a list of connected UAPs in your new controller. Some may be ‘Connected’ and some may be ‘Managed by Other’ if you are connecting UAPs that where once connected to a different controller (if required, reset them to allow them to be provisioned).
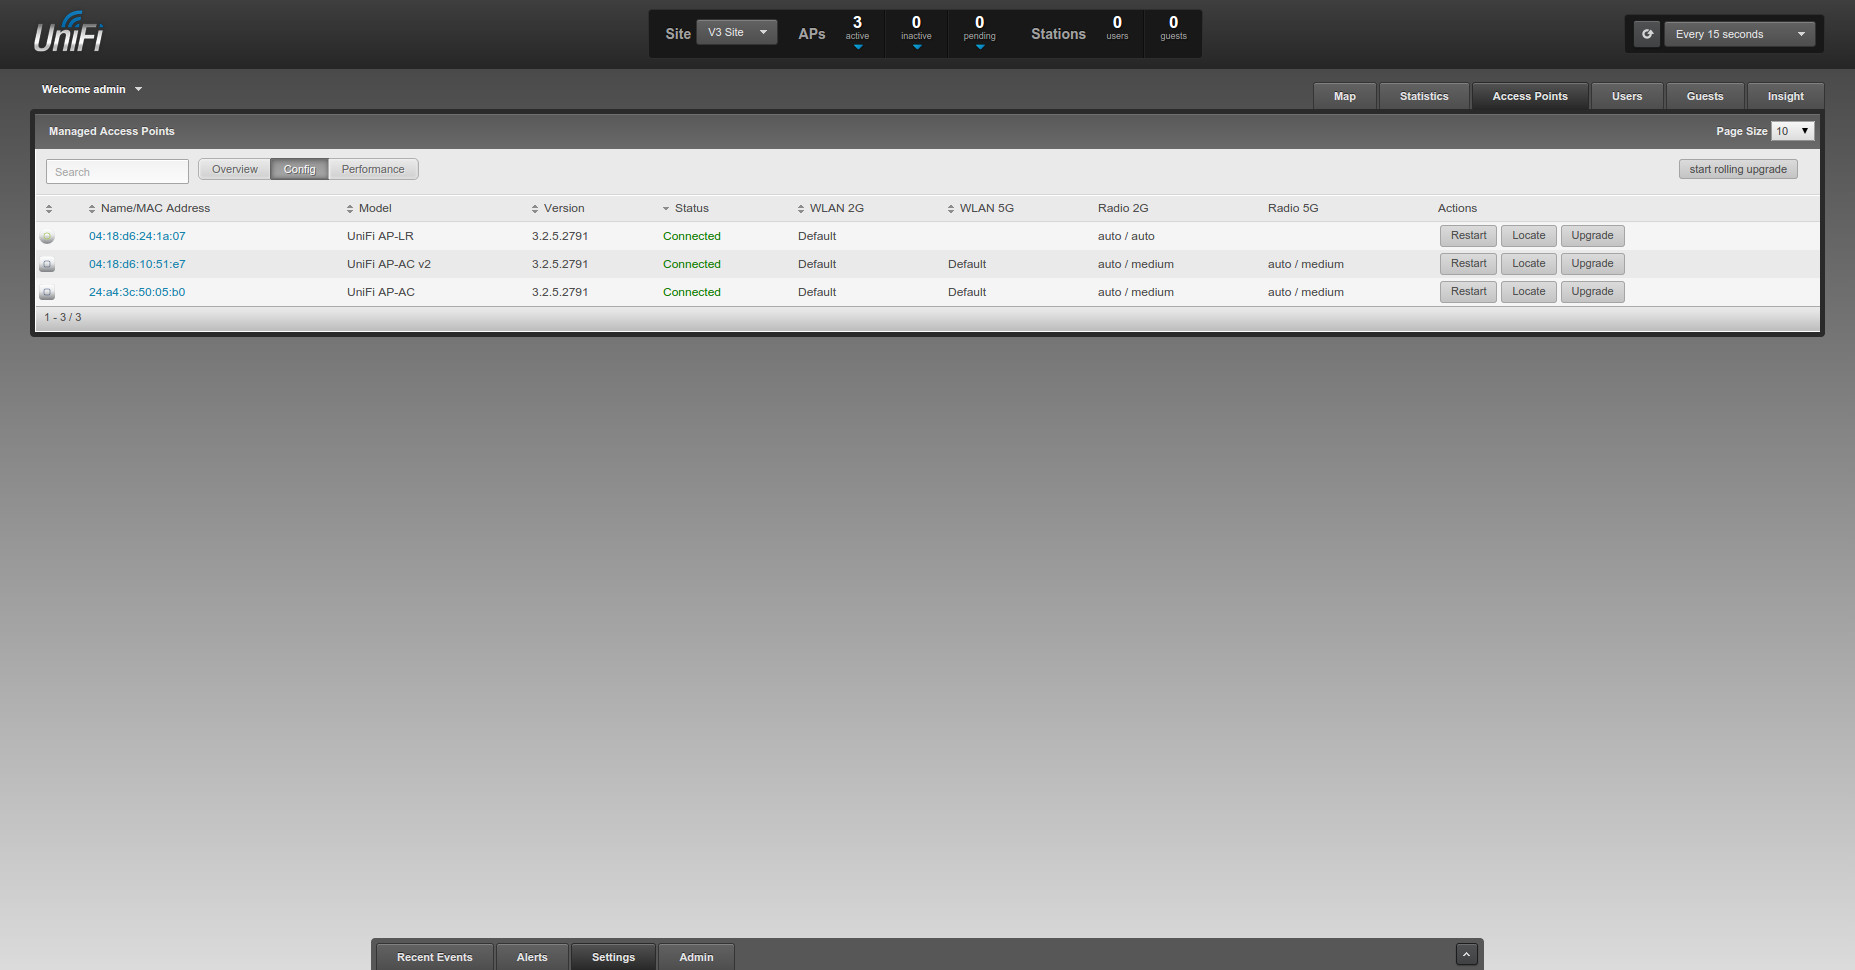

Now that all UAPs are adopted the WiFi will be live and ready for users to connect.
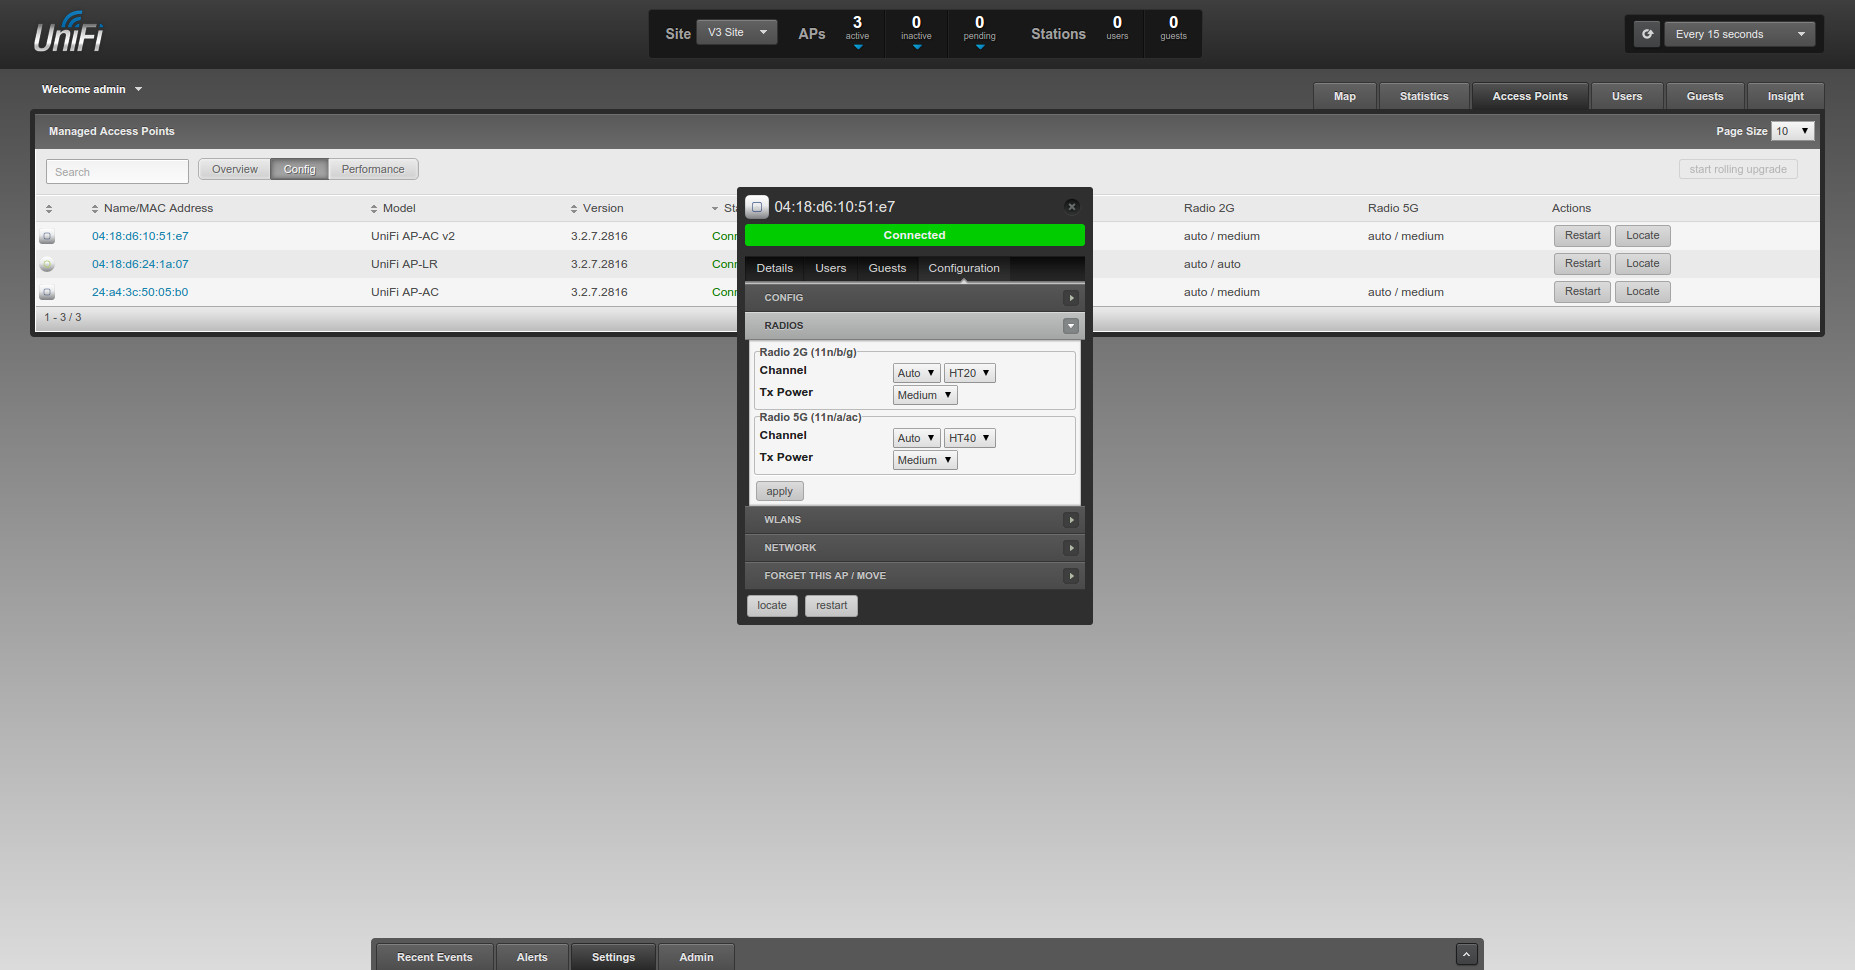
Managing a UAP
With all UAPs running and broadcasting a wireless signal we can now look into managing them a little better, first step is to check for firmware upgrades, these are really important as new firmware can improve the stability of the UAPs and provide new features that Ubiquiti has released (Especially so for newer products such as the UAP AC). Upgrading cannot be simpler. Just navigate to the Access point page in the controller as per the steps above, then simple click upgrade which will be available next to any UAPs that have available upgrades waiting. One thing you should know is that the upgrade process will shut down the WiFi temporarily from that UAP for the time needed to upgrade, if you have multiple UAPs then the ‘Auto Rolling Upgrade’ button might be the solution as this will upgrade the UAPs one at a time ensuring that the WiFi stays up in most areas allowing clients to connect to a nearby UAP instead.


The next step of managing a UAP is to give it a name and change its basic configuration, this can be done on a UAP by UAP basis to reduce power to reduce interference (especially so on 2.4GHz). WiFi bands can also be turned off here such as 2.4GHz or 5GHz or any secondary wireless SSID that you are broadcasting. The individual UAP configuration can be found by simply clicking on the UAP’s Mac address which will be blue and underlined, a new window will appears (V4 configuration windows will appear on the right). Select the configuration tab in this new window and you will be presented with a number of different options the first of which is Alias which would allow you to give the UAP’s a more friendly recognisable name rather than just it’s MAC address. The radios tab will allow power changes to be made along with channel widths (higher HT means more throughput but less range and some devices may not be compatible with HT40 and above). The WLANs Tab will allow individual management of the wireless signals being broadcast even overrides to create special networks in specified areas. The network tab will allow you to set a static IP for the UAP (although it is really recommended to do this on the DHCP Server on your router rather on the UAP itself). Lastly is the forget tab which allows you to remove the UAP from the controller or move to a different site on the same controller, this is important as it also performs a factory restore on the UAP which allows another controller to easily adopt it in the future.

What Next
All the information and instructions above are only a small fragment of what the controller is capable of. There are many more features available and much in the way of reporting and user management that has not been talked about here. If you wish to learn more then book a place on our Ubiquiti UniFi Wireless Admin course for some hands-on experience led by our Certified Ubiquiti Trainer who has over 30 years experience in RF and over 5 years specialising in WiFi products. To see all upcoming Ubiquiti training click here
Have a look at our Unifi Range here

Hi, Can I specify an IP Address and is it possible to perform a factory reset?
Thanks, Graham
Use the Configuration -> Network -> Static IP setting to specify the IP address.
You can forget the AP and it will reset the configure of the device. To fully factory reset the AP you will need to use the discovery tool.
Dear Sirs
Can we import a previously configured site to the hardware controller, or do you have to start from scratch?
You can take a backup from the previous controller and then restore it to the new controller.
Hi LinITX,
I’m trying to specify a static IP for the controller itself. Is it just a case of modifying the /etc/network/interfaces.d/br0 config – or will whatever script applies the 192.168.1.10 static override this?
Is there a better means of requesting this type of support for the controller?
Kind Regards,
Ashley
Hi,
There are 2 ways the safest being to edit the config file /etc/network/interfaces.d/br0 config. If you change the first line to read iface br0 inet static then your static details below the fall back address will never kick in.
The second way is via the Webmin gui, navigate to Networking –> network configuration, edit the Routing and Gateways first followed by Network Interfaces (ONLY edit br0). Reboot the controller and the static address should now be set.
Hope that helps
Koyn
LinITX
Hi,
I want to host the controller in my office (Not AWS) and maintain the AP is different locations. I want to know if static ip is necessary or could I use DDNS so that I can connect from anywhere? or it is possible at all?
Marc
You can use the dns name in the inform url setting. You need to make sure that the firewall into the controller allows the ports needed.