 LinITX Blog Ubiquiti & MikroTik Wireless Networking Experts

UniFi Talk is Ubiquiti’s Voice-over-IP (VoIP) solution, which has undergone many iterations over the last couple of years and now presents a very impressive offering. While UniFi Talk handsets are highly recommended for their full touchscreen support and industry-leading user experience, hybrid working is now commonplace in 2026, requiring staff to make and receive calls from anywhere.
Although the official UniFi softphone is integrated into the UniFi Identity app, it is not yet available in the UK. Fortunately, UniFi Talk supports 3rd-party handsets and softphones. This guide covers the softphone apps I tested and provides a step-by-step setup process.
Set Up New Softphone on UniFi Talk
Prerequisites
Before setting up a 3rd party softphone, ensure the following are in place:
-
- You have a UniFi Talk compatible console configured to manage the service (e.g. UniFi Cloud Gateway Max, Dream Machine Pro, Dream Router 7, CloudKey, etc.).
- You must have at least one UniFi physical handset to enable Talk.
- Talk should already have the SIP trunk, users, and groups configured.
- The user must have a phone line assigned (either directly or via a group) to make external calls.
Multiple Phones/Softphones Per User (Optional)
If an end-user requires multiple Phones (e.g. a physical handset and a softphone, or multiple softphones for different devices), they will need multiple UniFi Phones. This requires creating multiple UniFi People accounts for the same end user and linking them via a group.
- Primary Person:
- Set up this account as per normal, linking it to the user’s UniFi account for seamless UniFi Identity integration.
- Assign this account to the user’s primary phone.
- Secondary Person:
- Create this Person when adding a third-party device via the assign to > create new person option:
- First name: <FIRST NAME>
- Last name: <LAST NAME> (<OS>), e.g., Richards (Android)
- Email: Blank.
- Create this Person when adding a third-party device via the assign to > create new person option:
- Groups:
- Create a Group specifically for the user’s People accounts to serve as the user’s primary internal extension.
- Navigate to Phones > Groups > Create new Group:
- Name: <USER’S NAME> Phones.
- If the user has a DDI or internal extension, move it from their Phone/Person to this new Group.
- Set Call Handling to Simultaneous.
- Add the user’s primary Person as a Voicemail recipient.
- Navigate to Phones > Groups > Create new Group:
- Other Groups: Add each secondary Person account to all other groups (e.g., “Main” hunt group) to match the primary person’s group memberships.
- Create a Group specifically for the user’s People accounts to serve as the user’s primary internal extension.
Create a New UniFi Talk Phone for Each Softphone
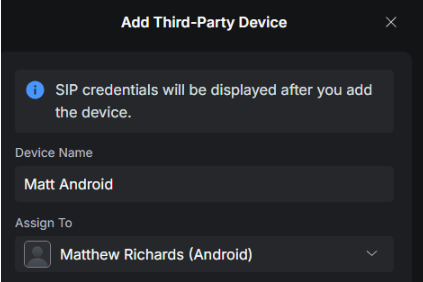
- Go to Talk > Phones > Add Third-Party Device.
- Set the Device Name, for example, “Softphone – Matthew Richards (Windows)”.
- Select the user to assign to.

- Click Add.
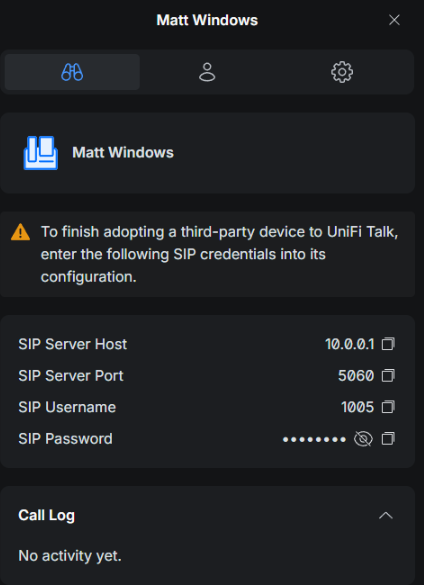
- Copy the SIP Server Host, SIP Server Port, SIP Username, and SIP Password, as you will need them for the softphone application.
Download, Install, and Connect Softphone
We tested popular Free Open Source Software (FOSS) softphone apps, including Linphone (recommended as its primary development team is European and it supports all operating systems) and Microsip (Windows only), and they all worked as expected. This guide uses Linphone, my recommended choice.
Linphone Download and install
- Download the relevant app for your OS from Linphone’s getting started page.
- Install the application.
Windows Setup
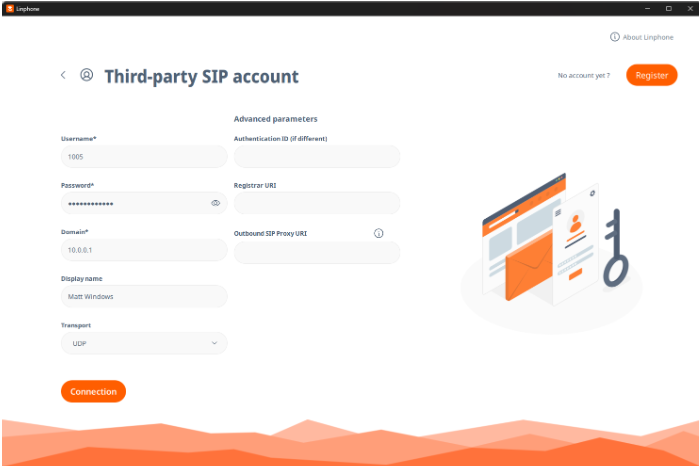
- In the Linphone app, select Third-party SIP account.
- Click I understand to skip creating a Linphone account.
- Configure the third-party SIP account with the details you copied earlier:
- Username: SIP Username.
- Password: SIP Password.
- Domain: SIP Server Host.
- Display Name: Match the phone name in TALK.
-
- Transport: UDP.
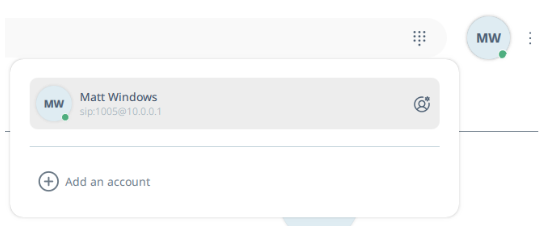
- Linphone should indicate the account is “Connected,” and the Phone in UniFi will show as “Registered”.

Android Setup
- In the Linphone app, select Use Third-party SIP account.
- Click I understand to skip creating a Linphone account.
- Configure the third-party SIP account with the details you copied earlier:
- Username: SIP Username.
- Password: SIP Password.
- Domain: SIP Server Host.
- Display Name: Match the phone name in TALK.
- Transport: UDP.
- Linphone should indicate the account is “Connected,” and the Phone in UniFi will show as “Registered”.
iOS, macOS, and Linux
Linphone is supported on Apple and Linux operating systems, and the setup process is nearly identical to the platforms listed above.
Remote Users: Running Over VPN
To enable remote users, I recommend setting up a VPN from the UniFi Talk console to the client device (where the softphone is installed). You can use solutions like Unifi One-click VPN, Wireguard, OpenVPN, or L2TP.
Alternatively, port forwarding also works, but ensure you have appropriate firewall rules in place, and the domain in Linphone is your public IP/DNS.
Training and Support
If you are interested in learning more, LinITX provides official UniFi training from our training centres in Sheffield and Needham Market. See here for more info: linitx.com/category/training/1060.
If you have any questions or need support with a new or existing UniFi deployment, call our Consultancy team on 01449 888 000 or contact us via email support@linitx.com or https://linitx.com/support-request.