LinITX Blog Ubiquiti & MikroTik Wireless Networking Experts

 Have you noticed unknown IP addresses on your office network?
The team at LinITX.com have received a few questions about this, and one main culprit is the “Rogue DHCP” server, which can wreak havoc on your network.
A quick overview of a DHCP server is: The DHCP server is paramount for assigning IP addresses dynamically to client devices, instead of a network admin manually assigning IP addresses and then possibly losing track of where the IP addresses were assigned to!
An IP address on each client device is needed so that information can travel where it needs to within a network, and this is assigned by your DHCP server. IP addresses are assigned by a DHCP server within a range that are reserved for either public or private networks.
The DHCP server will assign IP addresses using the DORA process, which works in 4 steps:
- Discover: The DHCP client will send out a DHCP message to discover a DHCP server that can assign it a unique IP address.
- Offer: The DHCP sever receives the DHCP message from the client and it will offer a unique IP address, and lease it to the client for a pre-defined amount of time.
- Request: The DHCP client will receive this offer and request the IP address from the first DHCP server that offered it.
- Acknowledge: The DHCP server replies to the DHCP client with an Acknowledge message which will confirm the Unique IP address will be assigned to it. The IP address will expire after the lease duration has completed.
A rogue DHCP server is a server that has somehow found its way onto your network, and is assigning IP addresses to clients. A rogue DHCP server can either be from a malicious attacker who wants to do a man-in-the-middle attack or it can be done unintentionally by an unknowing employee who has plugged their own router (with a DHCP server) into your network. This can become a problem when new devices are turned on or introduced to the network.
If the rogue DHCP server issues an IP address before the legitimate DHCP server, then the new devices will take an IP address from the rogue DHCP server. This can lead to issues where there are IP address conflicts, when two devices are assigned the same IP address. As previously mentioned, this will inevitably wreak havoc on your network and will ultimately lead to complaints from employees who are experiencing network issues.
Common issues caused by rogue DHCP servers:
- The rogue server can assign IP addresses that were already assigned by the legitimate DHCP server. This will lead to disruptions in network connectivity.
- Intermittent loss in network connectivity or inability to connect to the network altogether. If devices are assigned an invalid IP address within an invalid range, then the end device will not connect to the network.
- There might be security issues caused by a malicious attacker who can perform man-in-the-middle attacks by sniffing/capturing network traffic between devices. The attacker can also insert malicious data and links between devices.
The prevention:
- A relatively simple and easy-to-implement solution would be to turn on DHCP Snooping. Most enterprise network switches have this function and then you can apply DHCP Snooping to interfaces where end devices connect to. If you configure a Switch port to have DHCP snooping, DHCP Offer messages will be blocked on that interface and essentially render those interfaces as “Untrusted”. On the other hand, you can decide which interfaces are “Trusted” and can offer DHCP offer messages. Trusted ports are those that are directly connected to a legitimate DHCP server.
- Alternatively, you can block ports DHCP UDP ports 67 and 68 on your firewall, and then allow DHCP traffic from UDP ports 67 and 68 from your trusted interfaces, which are directly connected to a legitimate DHCP server.
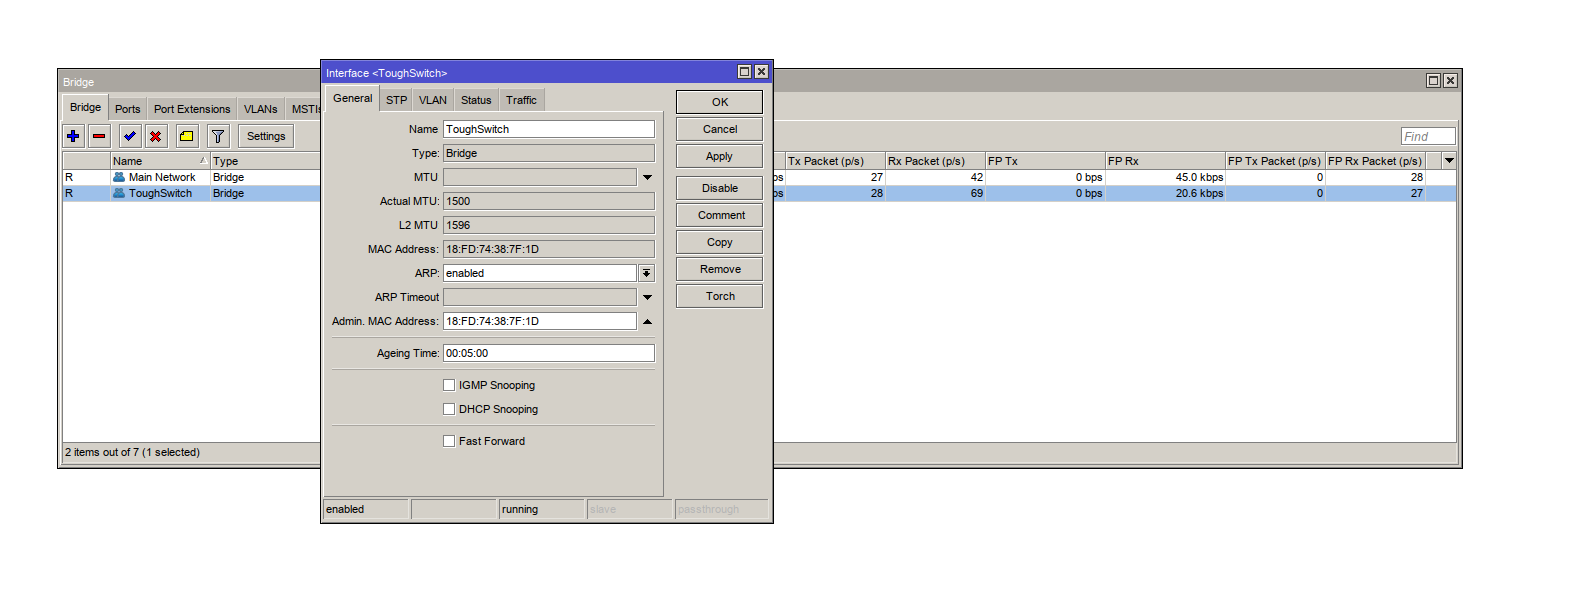
An example of DHCP snooping on Mikrotik
This scenario is if you want to add DHCP snooping to the whole bridge interface. Please note that this will block all DHCP traffic, so you need to make sure that you are not applying DHCP snooping on the same bridge in which your legitimate DHCP server is operating on. If you want to choose which ports on a bridge to trust then please see the alternate method below.
Navigate to your Bridge interface by using the left hand menu.
- Select Bridge in the left hand menu
- Click on the bridge that needs DHCP snooping.
- Click the checkbox for DHCP snooping
- Click “Apply” and then “OK”
Simple!
An example of DHCP snooping on specific ports on a Bridge interface
You will need to navigate to the terminal on winbox using the left hand menu.
1. Issue the command:
Interface bridge port print
This will allow you to see what numbers are associated with each port. You will need to note down the number associated with the untrusted ports. The number associated with each interface will be shown on the left hand side under the “#” column.
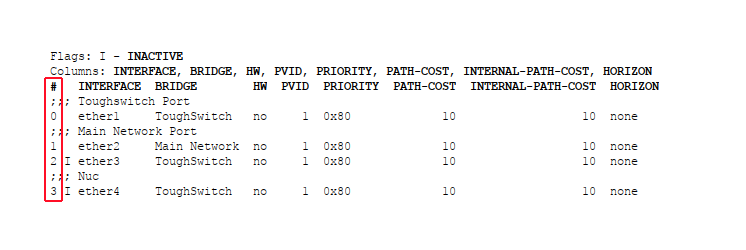
2. I will select the number #3 for ethernet 4 as the port that I would like to set as untrusted/trusted.
You will need to substitute “3” for the interface that you would like to target. Issue the commands one-by-one if you are planning to do this step for multiple ports.
Once you know which port number you would like to set as untrusted then you can type the following command:
interface bridge port set trusted=no 3
Alternatively, you can set a port to be trusted for DHCP messages with the following command:
interface bridge port set trusted=yes 3
3. Ethernet port 4 has now been set to either trusted/untrusted. You can confirm your settings by using the following command:
interface bridge port print detail
 The chosen port should show Trusted=yes/no.
After setting this up, you should not experience the rogue DHCP issues ever again.
If you have any issues relating to the above guide or have any questions relating to MikroTik routers and other devices, please call our team of experts on 01449 888000 or email shop@linitx.com